Posted on Leave a comment

Genealogy Do-Over update

I have progressed beyond Week 2 of the Genealogy Do-Over. Well, actually I haven’t progressed much beyond Week 2. I seem to be working on parts of Weeks 3-5 all at once. I got stalled on the Research Log (said in that whiney, dramatic way a child would) which is kinda crucial to moving on. I haven’t posted about what I did for the Week 2 Topics so this is a recap of what I have accomplished for the Genealogy Do-Over Weeks 2 through 5.

Topics for Week Two were:

  • Setting Research Goals – DONE
  • Conducting Self Interview – DONE
  • Conducting Family Interviews – not doing right now

One of my research goals has been to start a new proofed tree with proper source citations starting with my paternal line. I am going back through the direct line and will come down the line chasing after the collateral lines. As I do this, I want to organize everything in OneNote, citing sources, using a Research Log with a To-Do List. Establish some good genealogy habits.

I don’t plan to conduct any family interviews as (sadly) there isn’t anyone left to interview. I may try to contact my first cousins or their families from my uncle’s line at some point in the future. My uncle told me at one time that one of his grandchildren was interested in family history.

update1

For self interview I did a MS Word timeline. (I deleted the year of the events so I can still lie about my age.) My timeline gave me a to-do list of things to prove which had me hunting down documents to scan for future use in the Do-Over process.

===

Week 3 Topics

Week 4 Topics

Week 5 Topics

  • Tracking Research
  • Conducting Research
  • Managing Projects and Tasks – DONE
  • Tracking Searches
  • Building a Research Toolbox – DONE
  • Citing Sources

The task management system came together better than I thought. Posting about that next. (Don’t you hate those teasers?) Really, though, I wrote that post before this one and it’s scheduled to post tomorrow.

Building a research toolbox / toolkit is something I had already been doing in OneNote. I took the time to rearrange the sections in my main Genealogy Notebook to organize it a bit more and added some of the resources that have been mentioned through the Genealogy Do-Over.

===

These are the things I am still working on:

update2


The three things that have me stalled are interrelated. I am trying to round up and coral my thoughts and ideas on how best to accomplish keeping a research log with recorded searches and something that will make source citation easier all rolled into one. I have gotten better in the last year in keeping track of information for source citation, but tracking research and searches I have not been doing. I need to.

Thomas MacEntee has generously shared his Excel Research Log with Do-Over participants and there have been others who have uploaded their modified versions on the Facebook group. I’m not afraid of tables nor using Excel, but none of them were really clicking for me. No thoughts of “Oh, I could do this to modify it for my use”. Not even a glimmer of a thought. Which kinda meant I had to invent my own forms. And I really want to keep it all in OneNote. So I have been pondering. And pondering. And then avoiding. I finally decided I needed to get this done—this week—if I want to move on with the Do-Over.

Funny how when you DECIDE something should be DONE, inspiration will strike. I like deadlines because inspiration usually strikes right before I have to get something done. (It has to, because I have usually procrastinated right up until the deadline. LOL) But self-imposed tasks−like those in the Do-Over where no one is going to care if I do them−they can languish until I DECIDE they should be done or abandon them completely.

Two nights ago inspiration finally struck! The problem with those other research logs was that they didn’t leave the trail of breadcrumbs I want someone else to easily see and follow. There was nothing wrong with them, it was just me and my process that didn’t fit their mold. So then it was time to turn it around. How would a research log work in my process to leave a trail of easy-to-see-and-follow breadcrumbs? And that’s where I am at. Working on that form.

===

Post edited 23 April 2020 to remove link to Genealogy Do-Over Facebook group. I do not know if the group is active any more. I also replaced an old link to a link to a newer website for the Do-Over. Thomas MacEntee, the organizer of the Genealogy Do-Over has made all the information he shared on FB available at another website for free: GenealogyDoOver.com


Cite This Page:

Erin Williamson Klein, “Genealogy Do-Over update.” My Family History Files, 23 February 2015 (https://myfamilyhistoryfiles.com/organization/genealogy-do-over-update/ : [access date]).

Please do not copy without attribution and link back to this page.


Posted on 8 Comments

Part 2 – More Quirks – Section Groups & Sections

I have been busy behind the scenes working on updating my old OneNote posts, putting together some new posts and working through the Genealogy Do-Over Topics. The Research Log dilemma has me in a holding pattern where I am currently stuck in the topics for Weeks 3-5. Anne Faulkner’s (Ancestor Archaeology) Do-Over recap post had me laughing and nodding my head in complete agreement.

When my mind gets muddled overthinking things pondering life’s tough questions how I want my family history research to come together, I tend to avoid the problem give my mind a rest by pursuing some time-wasting endeavor on the computer. Just to clear my head, you know? (If you read between the lines, you might come to the conclusion that I am a procrastinator…) In my research-log-decision-making-avoidance mode, I started a new quilt design for a quilt that has a pedigree chart on it with an appliqued tree and leaves. Copying and pasting all those leaves onto my quilt design and then coloring each one with a different green fabric? Complete time-waster…

predigree-quilt (I know it doesn’t look like much here, but I haven’t finished the whole tree applique. Just imagine your ancestors names in the beige rectangles and photos in the beige diamonds and something like this starting at the bottom left and going out and up around the chart with leaves. Lots of leaves. But not so much detail on the trunk…)

===

I thought perhaps I should do something more productive today. Move a few things off my Task Manager To Do’s. (Like get that research log decision made and just jump into working with whatever I come up with!! Use it now, tweak it later?)

There have been a couple of questions about organizing Section tabs and Pages for each person so I thought I should address how that has evolved as I have been working in my Williamson Surname Notebook. Basically, I have changed the Section Group setup by adding a third group.

Originally I had only two Section Groups created to hold Sections for individuals in my family tree. One for the direct surname line and another for non-direct names organized alphabetically. As I started adding more and more Sections to my notebook for each person, it became apparent that this setup wasn’t going to work for me in the long-term so I reorganized the groups. For now I have three Section Groups. Section Groups alphabetize themselves and I wanted my Section Groups in a certain order so I added numbers to their names.

surname1

===

One important thing to note and something I have to keep reminding myself is I want my OneNote Notebook to be a digital duplicate of how I had my physical binders set up. My original binders were set up in family groups with their records grouped together behind a printed family group record. Once a person got married or remarried, a new family group record was created and the related family documents grouped behind it. (By the way, if you are using OneNote to share your research or to create a digital backup up of the physical notebooks you already have, for convenience and ease of setup, create and layout your OneNote Notebooks just as you did your physical notebooks!)

So rather than think that each Section tab was for an individual person, it should be that they are for a family group. (Banging my head against the desk and saying, “Duh.”) I haven’t yet decided if I am going to keep the naming convention I originally set up [male name only] or rename the Sections to include the wife/mother’s name. If I switch to adding the wife/mother’s name to the Section tab name, I was thinking I would have to add a new Section for subsequent marriages. That hasn’t been an issue for my direct-line ancestors; but as I get more into the collateral lines, I will have to give this a hard think.

This is the Direct Line Section Group for my Williamson Surname Notebook. In each Section are Pages for people in the family group.

surname2

===

I am working on getting things in order on my direct line to start, however, I have some records for my collateral Williamson lines. As I was adding them to the original Non-Direct A-Z Section Group, it was getting a bit overcrowded in the W-X Section. I decided they all needed their own Section Group. This newly created second Section Group is for your collateral lines of the same surname. By the way, the Sub-Section Group ‘Who Married Whom’ is for a research rabbit hole. Two Williamson men married two Williamson women in a double wedding ceremony. The marriage index doesn’t list parents’ names for any of the four. I was trying to figure out which ones I was related to (all four names match people in my tree) and the resulting avalanche of records I gathered needed its own Section Group. (I’ll tell you about the rabbit hole another day…)

surname3


 ===

The last Section Group is for lines that have ‘married into’ my surname. Obviously that includes some new direct line surnames as well as husbands to Williamson females. For the surname for my great grandmother, great-great grandmother and on, I have created separate Sections in the front of the A-Z tabs for them. Instead of a separate Section, each family group gets a Page with Sub-Pages. If the Section gets too cumbersome to navigate (too many pages of family groups), they can be moved into their own Section Group or even their own Notebook if needed. Right now, that isn’t been a problem and I’ll think on it when I have to.

surname4
I hope that helps you understand a little bit better how I have been organizing my family groups in my Surname Notebook.

===


Part 1 – Quirks of My Notebooks – The Main Sections

Part 3 – Quirks Continued – Pages for Family Groups


===


View on OneDrive

Surname Notebook – Sources sorted by Record Type

View on OneDrive

Surname Notebook – Sources sorted in Chronological Order

View on OneDrive

Research Quandaries Notebook

Link to “By Record Type” Surname Notebook Link to “Chronological Sources” Surname Notebook Link to Research Quandaries Notebook
Surname Notebook by Record Type PDF Surname Notebook in Chronological Order PDF


===

This post was updated 10 April 2020 with new links to the notebooks on OneDrive.


Cite This Page:

Erin Williamson Klein, “Part 2 – More Quirks – Section Groups & Sections.” My Family History Files, 20 February 2015 (https://myfamilyhistoryfiles.com/research-plan/surname-section-groups-and-sections/ : [access date]).

Please do not copy without attribution and link back to this page.


Posted on 3 Comments

Downloading record images to save for a rainy day

Updated 6 February 2015: It appears my source of information about the Ancestry free access day was misinformed. The free access appears to be for records in the UK, not access to all Ancestry records. I edited the post to reflect this change.

This weekend Ancestry is offering free access to their UK records. I know quite a few of you are involved in the Genealogy Do-Over and the free access is a Bright Shiny Object (#BSO) that could suck away your weekend in no time. For me it is a BSO because I have given up my Ancestry membership temporarily while I work on getting my files in order and I will not be resisting the temptation of free access. I plan to take advantage of it. Fortunately I won’t have unlimited Internet access until Sunday afternoon so I cannot get sucked into a weekend-long, follow-every-rabbit-trail, download-until-I-am-cross-eyed marathon. I have taken advantage of the free access to UK and Canadian records in the past and used OneNote to aid me in the process.

This is a post about how I use OneNote when the free access to Ancestry’s records is offered without letting it becoming a Really Big and Beautiful BSO that sucks me in not only for the weekend but possibly even longer. I could enter the record images I am downloading onto a Research Log. However it takes time and thought to be sure I am putting information in the log correctly and on the correct log. (I have a separate one for each surname.) I also have a tendency to get sidetracked looking at people’s trees and using the search function to fall down rabbit holes. I want to keep as focused as I can and I want a quick and easy way to download the records and cite the sources. I will go back at a later date and analyze the records, record everything in my Research Plan and on my Research Log and then write up my written conclusion before I enter anything into my genealogy software—steps 8 through 13 of my workflow.

If you want to use my method for quickly capturing records, there are a couple of things you need to do before you start.

  1. Make a new folder on your hard drive just for the record images you are going to be downloading during the free access.

freeaccess1
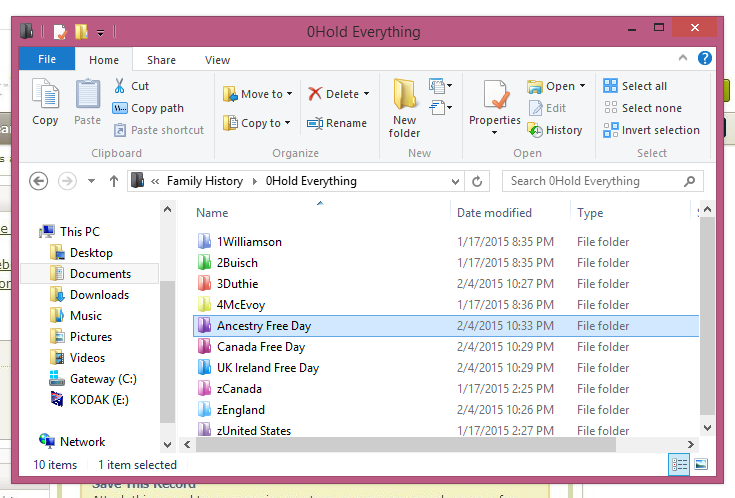
Because I am participating in the Genealogy Do-Over, all my files are in a HOLD folder. I created a new folder called Ancestry Free Day for this weekend’s downloads. You can see that I also have a folder for a Canada Free Day and a  UK Ireland Free Day that were previously held.

  1. Be sure to install the Clip to OneNote app for your web browser. Here is the link for the OneNote Clipper: https://www.onenote.com/Clipper/OneNote

insert1
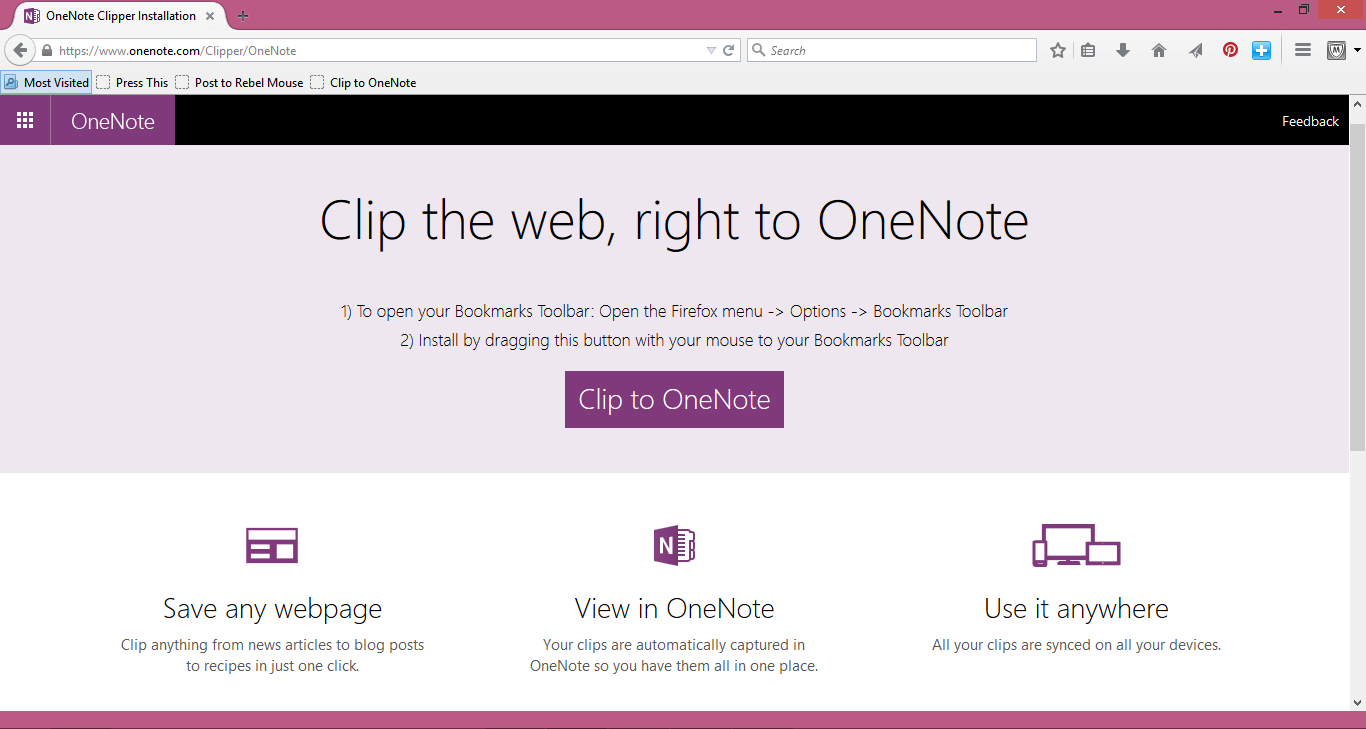
I use FireFox as my web browser so the OneNote Clipper app web page gives me the instructions on how to install the clipper for FireFox. The page should display whatever instructions you need to install the clipper in your web browser.

Now once the free access begins, you are going to start downloading record images to the folder you created. Some of the images you are going to know that, yes, this is my person and some you are not going to be sure. Download them anyway. Trust me. Just do it. If I find five Ray Williamsons in the the 1930 Rochester Census, I am going to download all the images. If I find three baptism records for William Williamson in Lancashire England, I am going to download all of them. You are going to download now and analyze their usefulness later. I figure if a record turns out to be useless or a duplicate, I can delete it later. It does help your focus if you have some research goals already in mind though! My focus for this free access weekend is going to be on my direct lines from England and the Isle of Man.

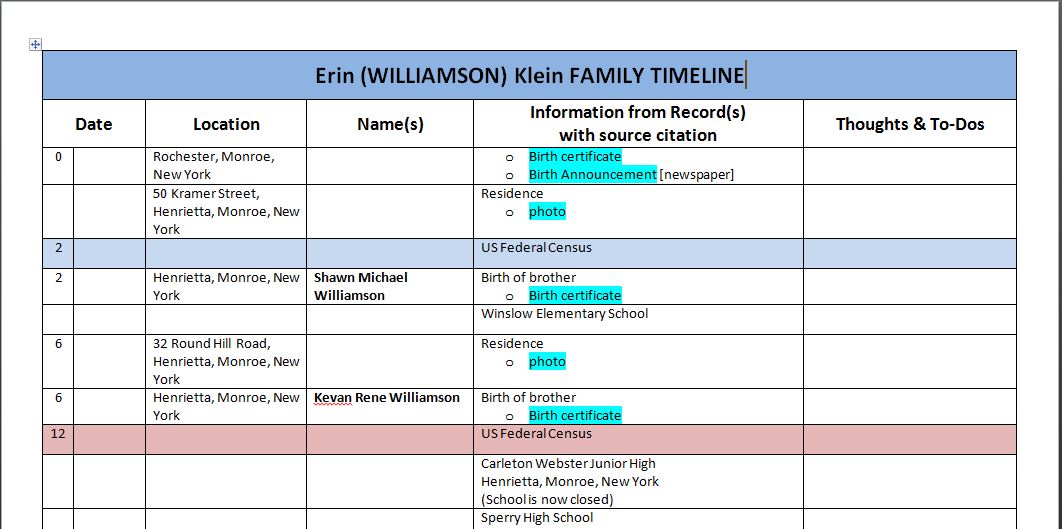
As you are downloading and naming the saved records, number them in chronological order. This will help you later with the Source Citations you are going to copy as well.

freeaccess2
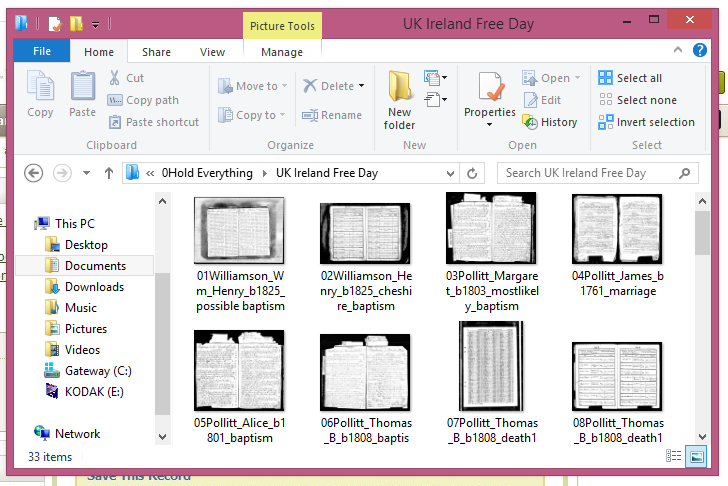
I number them 01, 02, 03, etc. with Surname_FirstName_Initial_b####_recordtype. The b#### is for a birth year—even if it is approximate—as it helps me distinguish between family members with the same name. Along with the record type, I may make personal observations like ‘most likely’ or a place name or something else pertinent to the record image.

I am going to digress here a bit to explain why it is helpful to download records that come up in searches or shaky leaf hints other than those that you know  for certain are for your specific ancestor. My great-great grandfather, Wm Henry Williamson was born about 1825 in England. The birth year is guesstimated from a ship’s manifest, censuses and cemetery interment records. His parents are Thomas and Margaret Williamson both born about 1803 in England. There are at least three different Thomas and Margaret Williamson couples that have been linked as possible parents in baptism records to my great-great grandfather on Ancestry and FamilySearch. One Thomas is a farmer in Cheshire, another is a weaver in Lancashire and the third is a tollgate keeper also from Lancashire. So which one is the right couple? Or are any of the linked baptism records the right one for my great-great grandfather?

If I am applying the Genealogical Proof Standard to my research, I should have copies of as many baptisms of the children from these couples as I can find to prove or disprove my written conclusion on whether the farmer, the weaver or the tollgate keeper is Wm Henry Williamson’s father and that a particular baptism record is indeed the correct record for him, right? So I am going to download pretty much every baptism record I can find for any child with parents Thomas and Margaret Williamson in Cheshire and Lancashire.

There are three ways to get the source citation information from Ancestry into OneNote. I realize that the source citation information from Ancestry might not always be in the correct format as outlined by Elizabeth Shown Mills in Evidence Explained nor contain all the information you need to properly cite a source in your genealogy software. Three things I try to consistently do as I am copying citations from Ancestry is to (1)Identify the source citation in such a way that it is clear which record image the citation belongs to (the chronological numbering), (2)Provide myself with the date I accessed the record online and (3)Add the page link in case I need to go back to the record later.

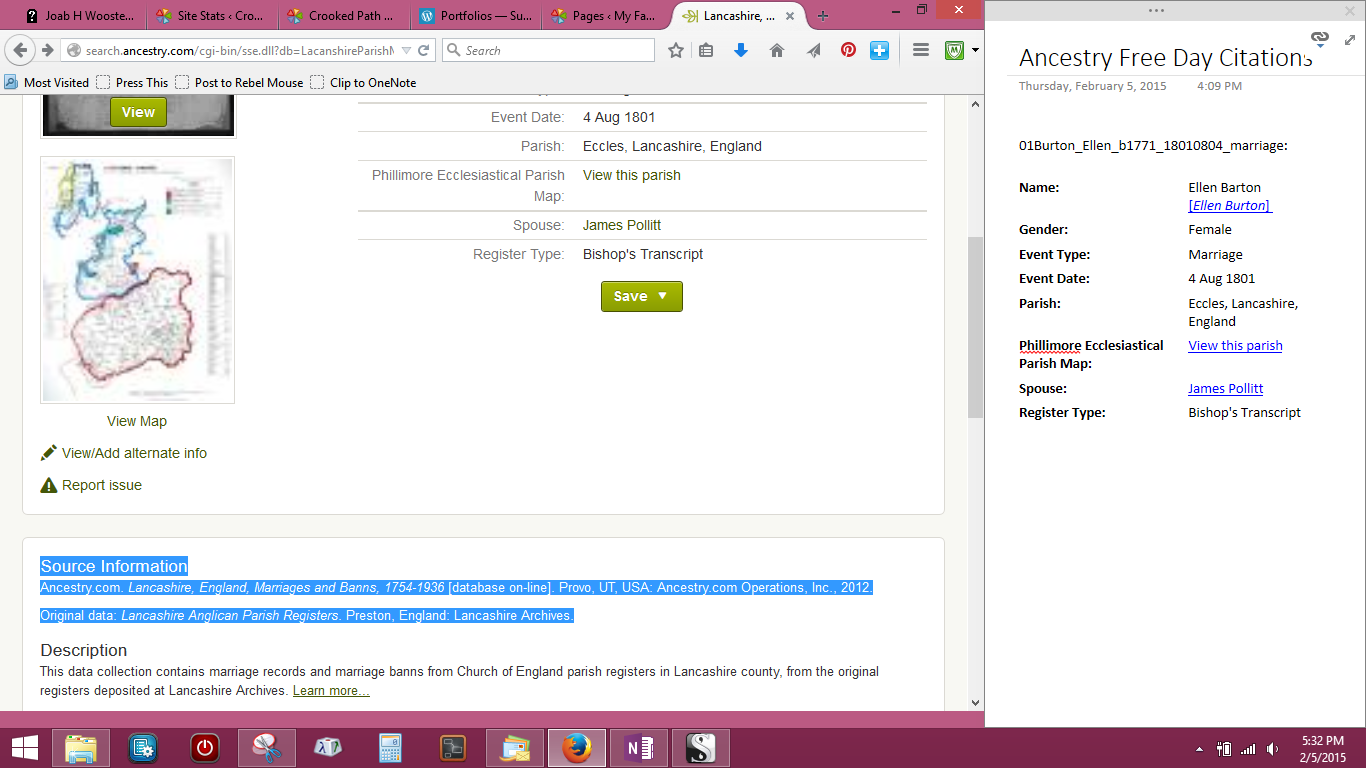
The simplest way to capture the source information for a record image you have downloaded is to use the Clip to OneNote app for your web browser. Anything you clip from the web with the app goes to the Quick Notes Section of the first notebook that was created when you installed OneNote. Even if you renamed that section, your clips from the web should end up there. It takes a few seconds for the record to show up in the Quick Notes Section; but as soon as it does, I add the chronological number in front of the title so this source matches my downloaded record image.

freeaccess3
Two things to note—At the bottom of this image is the link to the web page that the image was clipped from. It is inserted automatically on my OneNote page but I didn’t want to make the graphic even smaller to show it. You’ll also note that all my source citation pages that were created during the UK Ireland free access day have been moved from the Quick Notes Section to the Inbox of my Williamson Notebook. That is the drawback to using the Clip to OneNote app—you cannot tell it where to put the clip so you have to go back later and move them.

The second way to capture the source information is to use the Screen Clipping Tool in the Send to OneNote app.

freeaccess4
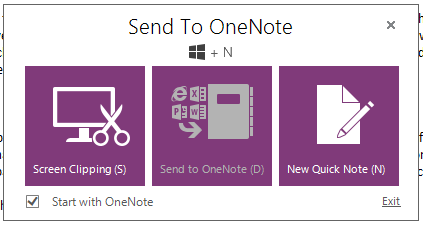
You can clip just the portion of the web page that is relevant to the record image you downloaded. After you have clipped the source citation information, you are asked where you want to send the clip. I send it to the Inbox of the appropriate Surname Notebook.

freeaccess5
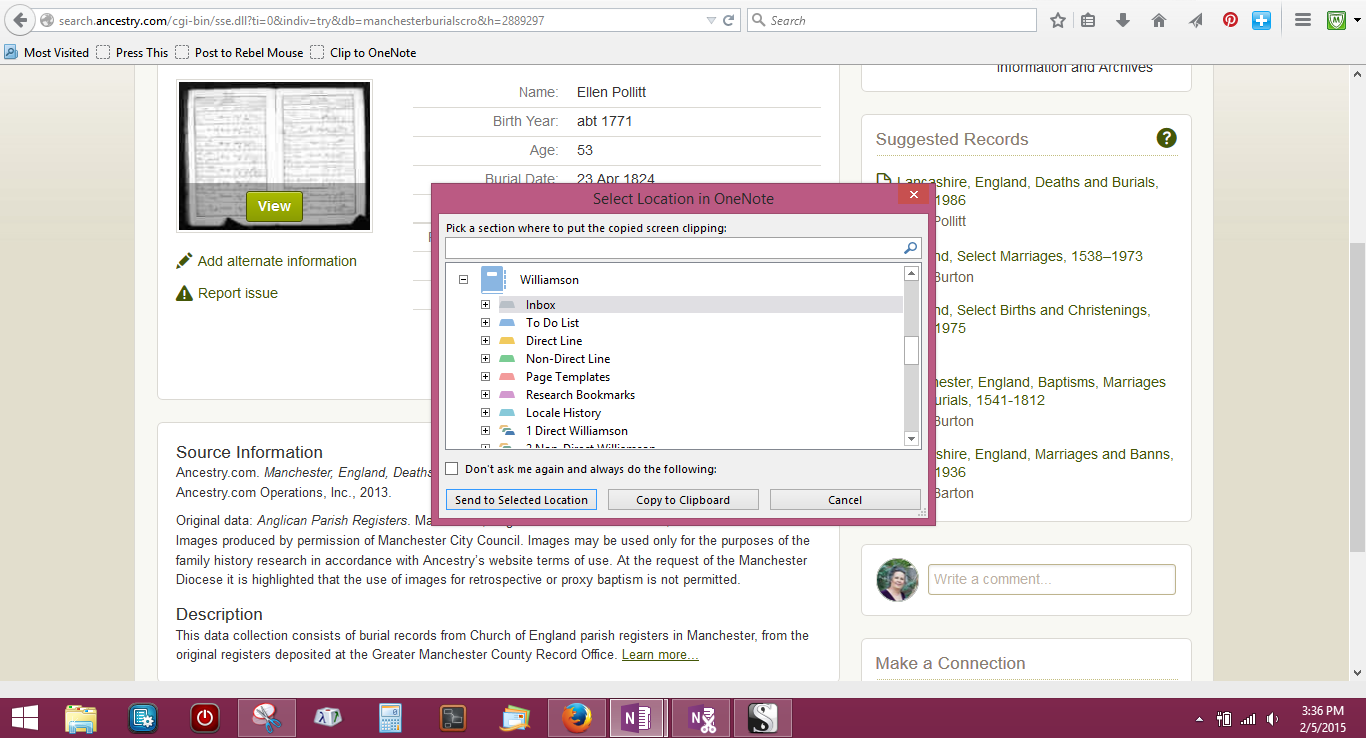
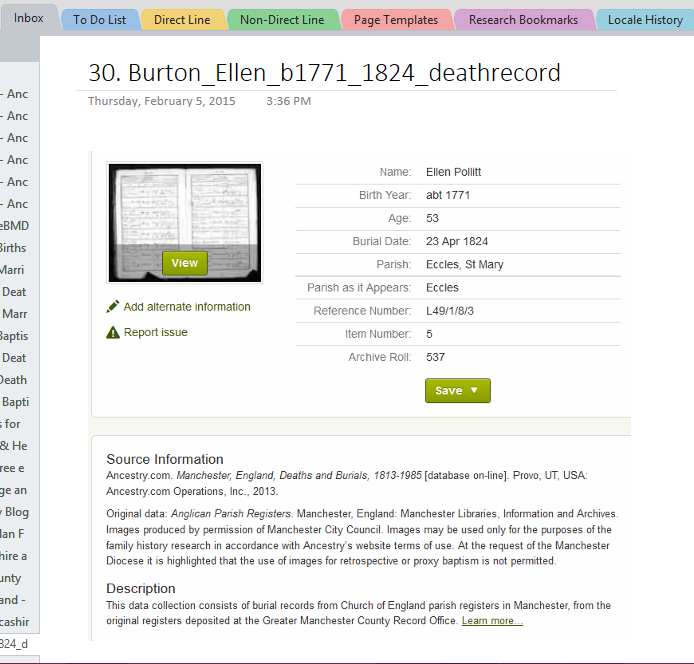
When the clip gets to your Surname Notebook Inbox, you will have to add the title. I use the same number and file name I used when I saved the record image. The drawback to this method is that the web link is not automatically added at the bottom of the page so you have to remember to go back and add it.

freeaccess6
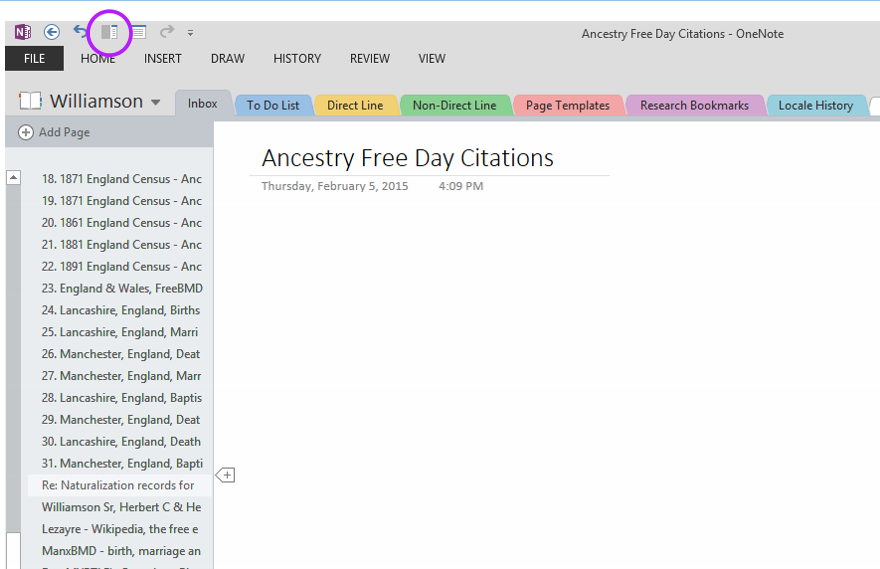
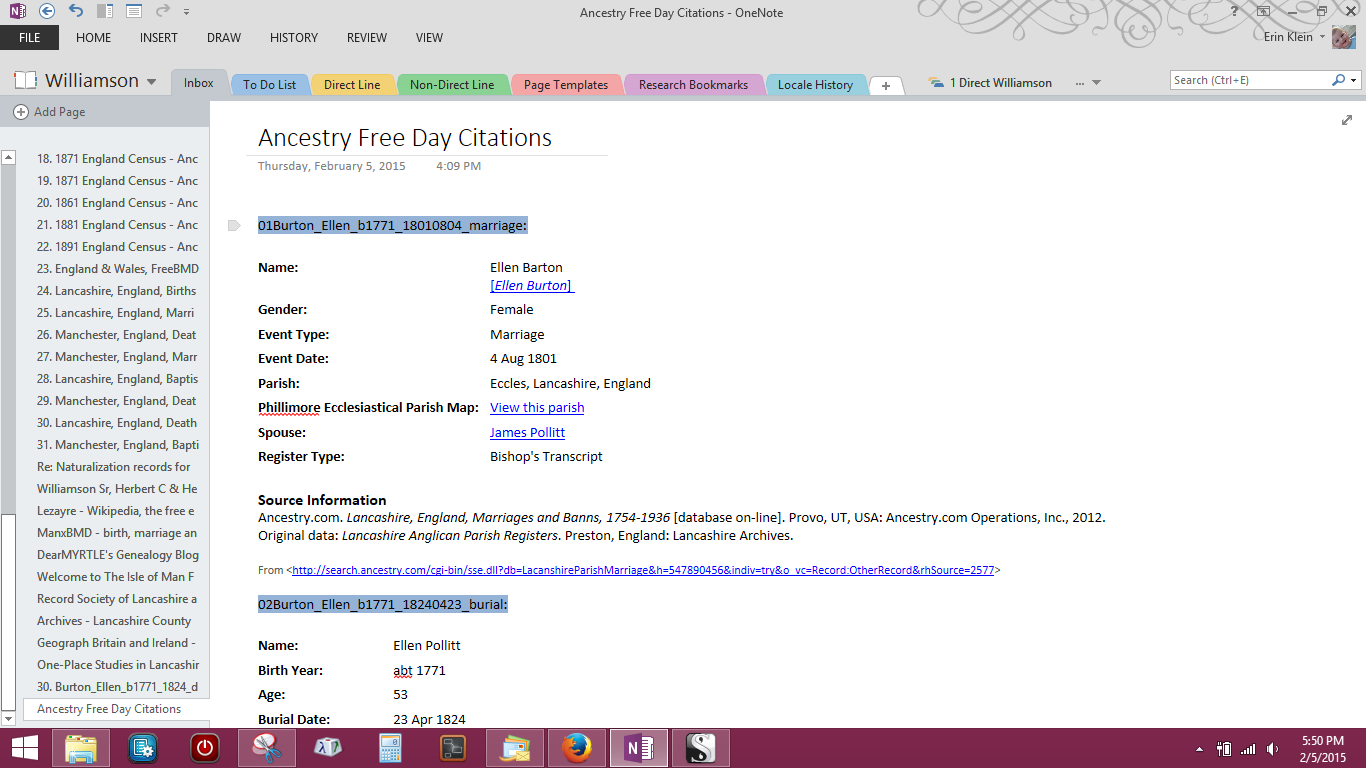
The third method involves a bit more copying and pasting but in the long run it sets you up nicely for inputting information into your Research Log when the time comes to start working with the records and analyzing what you have saved. In your Quick Notes Section or the Inbox of one of your Surname Notebooks, create a new page. Because the folder I created to hold the record images is called Ancestry Free Day, I named the new page Ancestry Free Day Citations.

freeaccess7

At the top right of OneNote, there is a little icon that looks like a split screen. When you click it, your blank page should shrink and dock itself to the right side of your computer screen. If Quick Notes doesn’t dock to the right of your screen, click on the down arrow under the linked chains and choose Linked Note Options. Under Display, be sure the box next to Dock new Quick Note windows to the side of the desktop is checked. Now you can have your web browser opened and the Quick Notes window at the same time. (You can smoosh the Quick Notes window up a bit if you want to make your browser window just a bit wider.)

The first record I saved is a marriage record for my 4th great grandmother. In Quick Notes, I have copied and pasted the name I used for the downloaded record image, the information about the record image from Ancestry and I have copied but not yet pasted the source citation information. A link back to this web page will also be inserted into Quick Notes. After I am done with that record, I will move on to the Suggested Records links that Ancestry shows me on the current record page (if there are any) and repeat the process.

freeaccess8
To undock the Quick Notes window, click on the arrow icon. My Ancestry Free Day Citations page will look something like this after I have added all my record image citations. You can see how copying the source citation information this way will lend itself to easy copying and pasting directly into a Research Plan or Record Log at a later date.

freeaccess9
So there you have it. Go, play and download lots of record images to save for a rainy day.

===

Post edited 23 April 2020 to update links to the Genealogy Do-Over.


Cite This Page:

Erin Williamson Klein, “Downloading record images to save for a rainy day.” My Family History Files, 5 February 2015 (https://myfamilyhistoryfiles.com/organization/downloading-record-images-to-save-for-a-rainy-day : [access date]).

Please do not copy without attribution and link back to this page.