Posted on 1 Comment

Attaching Files in OneNote

alphabet treeHere I am going to show you how to Attach and Insert Files into [onto?] Pages in OneNote. I equate “attaching” with “linking.” I am linking to a File on my hard drive, another Notebook, Section or Page or linking to information on the web.

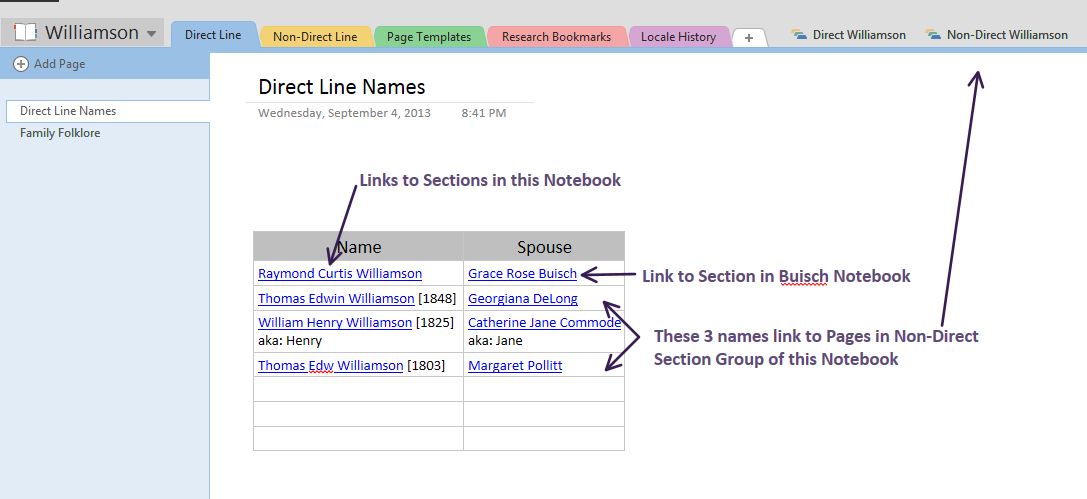
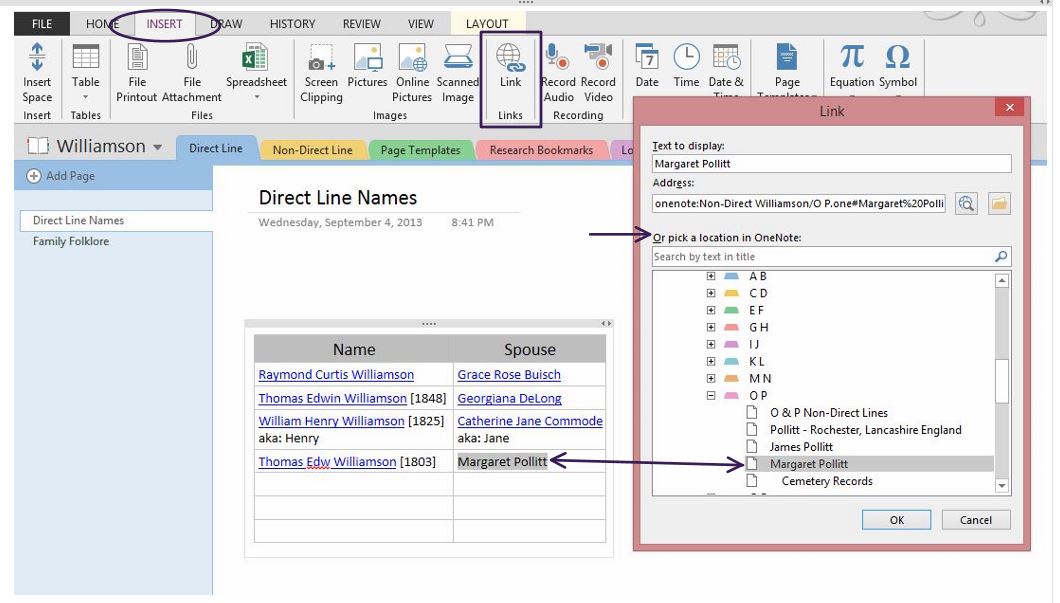
The first place I do this in each Surname Notebook is in the Table on the Direct Line and Non-Direct Line Sections for each Surname Notebook. Both Tables combined are a list of everyone I have entered in the Surname Notebook so far.


files1

===

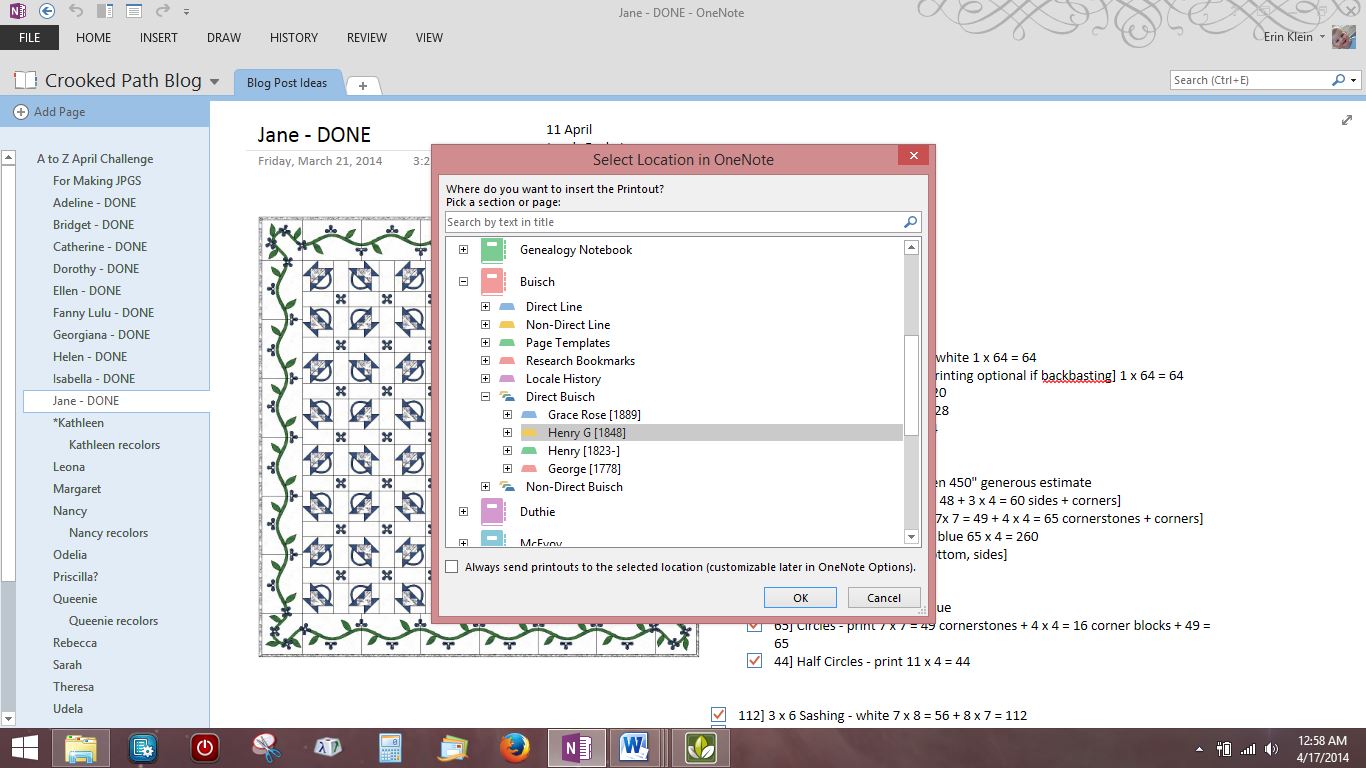
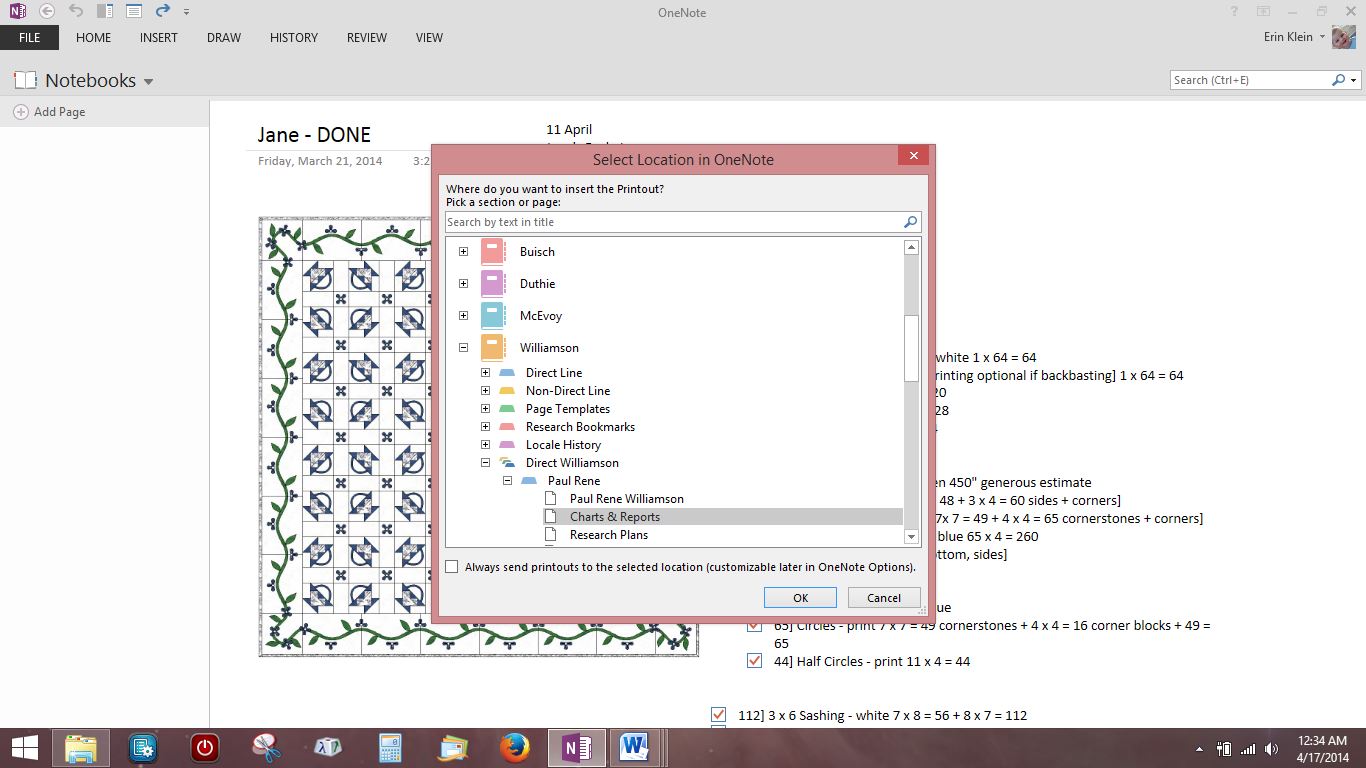
Making Text a Link is the same procedure you use in MSWord. Highlight the text with your cursor−in this case Margaret Pollitt. On the Insert Ribbon [menu], choose Link. I am using the “Pick a location in OneNote” option so I find my way to where Margaret Pollitt’s Page is located in my Williamson Notebook. When I Click > OK, Margaret’s name in the Table becomes a link to her Page in the Notebook.

files2

===

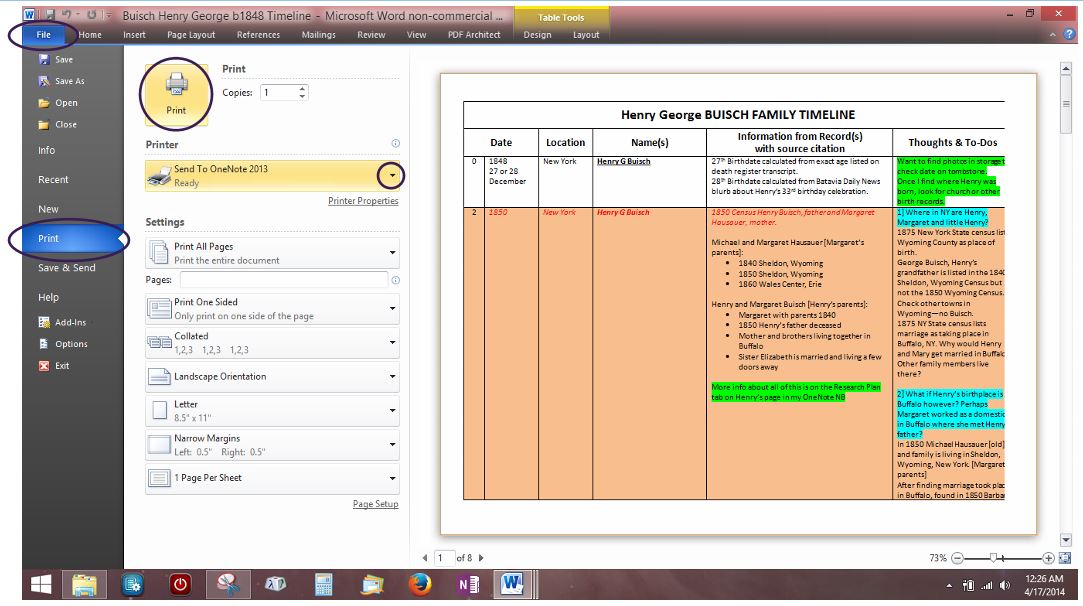
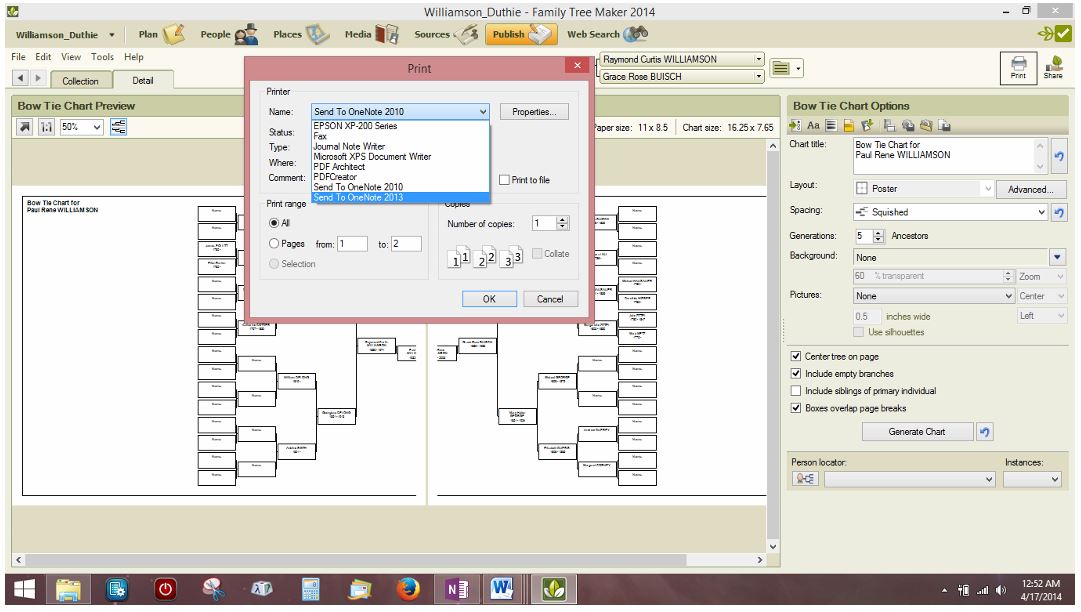
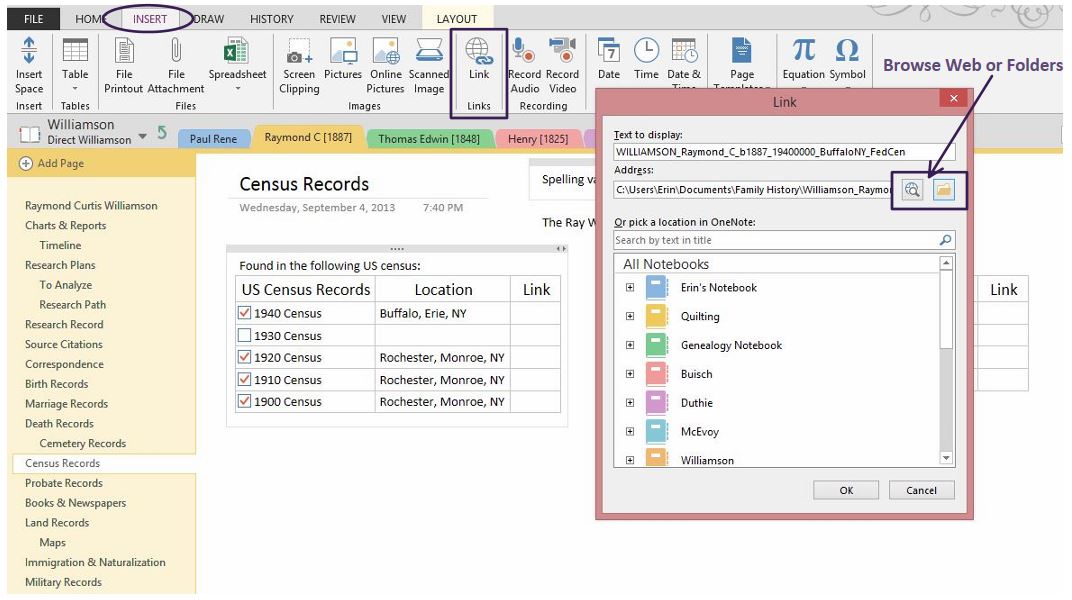
You can Attach a File anywhere on a Page by placing your cursor wherever you would like the Link to appear. Click > Insert > Link. You can browse the Web or Folders on your hard drive for files to link to in addition to your Notebooks, Sections and Pages. I found the folder for my grandfather’s files on my hard drive and chose the census document I needed to attach in my Table. After I found the appropriate file, I changed the Text to Display to show the year and location of the census.

files3

===

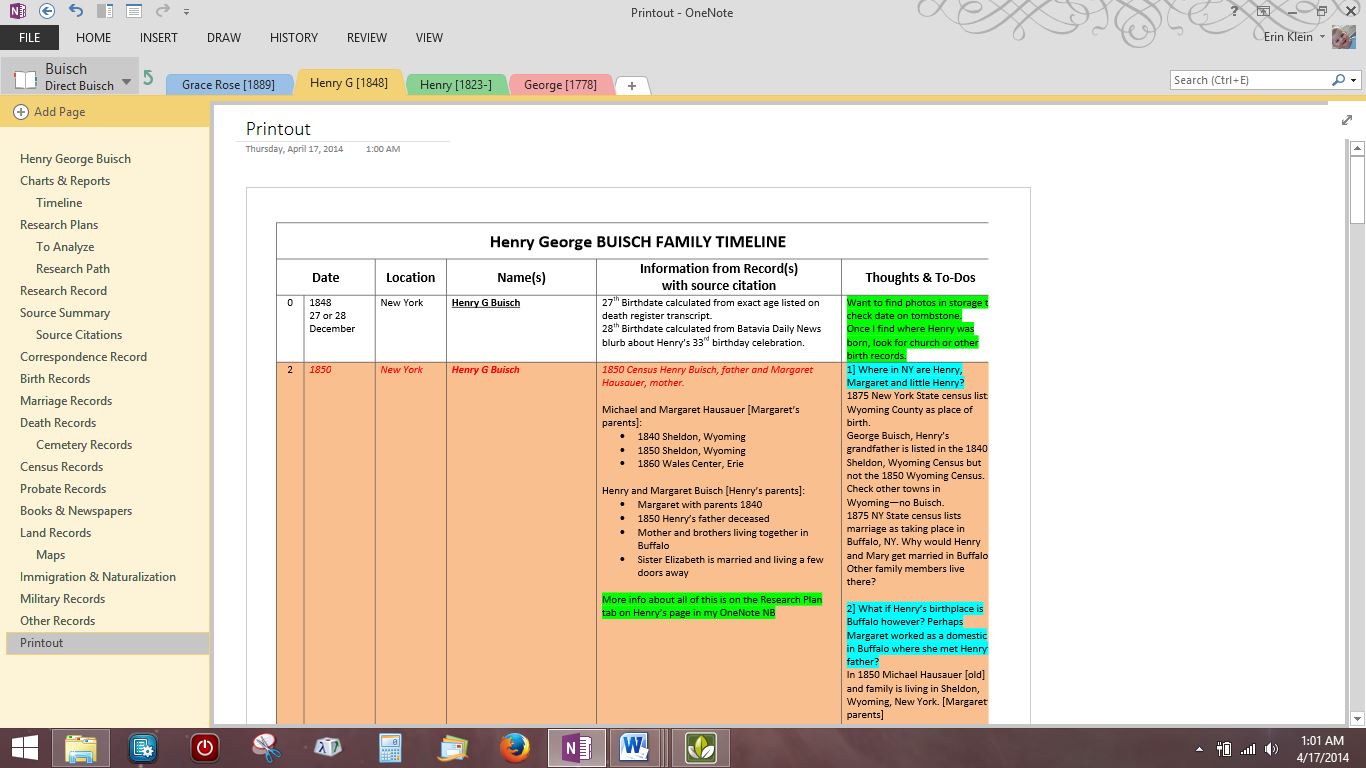
I linked to all the census documents I had for my grandfather.

files4

===

Below, the PDF icons link to newspaper pages that contain articles about a great uncle that found himself in a bit of trouble in his early twenties. I used File Attachment to add them to his Page. I could insert a copy of the newspaper page using File Attachment, however it only displays a portion of the newspaper page.

files6

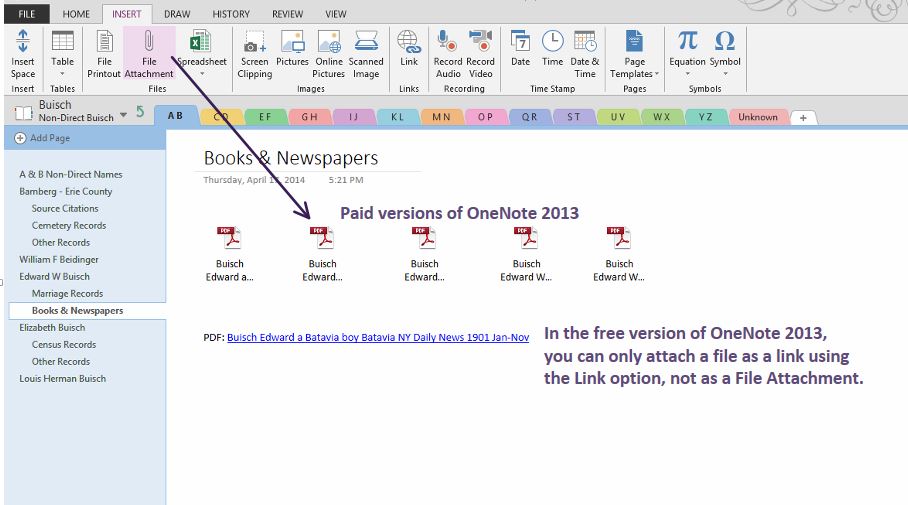
In a later tutorial I will show you how to insert the individual newspaper articles as another option.

===

________________________________________________________________________________________

Cite This Page:

Erin Williamson Klein, “Attaching Files in OneNote.” My Family History Files, 14 April 2014 (https://myfamilyhistoryfiles.com/organization/attaching-files-in-onenote: [access date]).

Please do not copy without attribution and link back to this page.

________________________________________________________________________________________

Posted on 2 Comments

Printing to OneNote

P is for Printingalphabet tree

The easiest way to add a file−document, PDF, photo, genealogy chart−is to use the Print Function in the program where you are viewing the document. If you would like to “see” the file on a Page in your Surname Notebook, this is the simplest way to accomplish that.

One of the Pages that I have added to my direct line ancestors is a Timeline that I’ve made up as a table in MSWord. Shown below is the 8 page Timeline for my great grandfather, Henry George Buisch.


print1

===

To get this document into the Buisch Notebook in Henry’s Section, I would Click File > Print > Under “Printer” choose “Send to OneNote 2013” from the drop-down menu > Click Print.

print2

===

Note that I have OneNote in my task bar at the bottom of the screen but it’s not currently opened. After a few seconds, the task bar icon will start to blink. When I open OneNote, I get a window that that asks where I want to insert the printout with a list of my Notebooks. I can choose a Section or a Page inside a Notebook. I want the Timeline to be on its own Page that I will make a Subpage of Charts & Reports so I chose the Buisch Notebook and then Henry’s Section.

print3

===

OneNote opens the Notebook and Section I chose and the Timeline is added as a Page at the bottom of the Page Navigation Menu as “Printout”. All that’s needed is to change the name of the Page and to move it up under Charts & Reports and then slide the Page tab to the right to make it a Subpage.

print4

 ===

I really love this option for the Charts & Reports that are available in my genealogy software. I decided to add the Bow Tie Chart I created for yesterday’s post where I was trying to figure out how many names I would have going back 5 generations from my father’s parents to his Charts & Reports Page. Here is the chart in Family Tree Maker. Click Print > Choose Send to OneNote 2013.

print5

===

This time I chose the Charts & Reports Page instead of just my father’s Section in the Williamson Notebook.

print6

===

The Bow Tie Chart is inserted onto the Charts & Reports Page for my father. I moved the second page of the chart up to nest next to the first page.

print7

In the next two posts, I will show you other ways to attach and insert files.

===

________________________________________________________________________________________

Cite This Page:

Erin Williamson Klein, “Printing to OneNote.” My Family History Files, 12 April 2014 (https://myfamilyhistoryfiles.com/organization/printing-to-onenote: [access date]).

Please do not copy without attribution and link back to this page.

________________________________________________________________________________________

Posted on 2 Comments

Gather Your Research Documents

G is for Gatheralphabet tree

I am going to suggest a slow, steady and systematic way to input your research into your Surname Notebooks. It’s really not as daunting as it sounds.

1. Pick just one Surname to start with and focus solely on that Surname.
2. Start with the closest person related to you in that line that is deceased. For many of us that would be either a parent or grandparent.

I chose to start with my father’s line as I don’t have all my mother’s line entered into my genealogy software yet. I figured if I started with my grandparents in that line and went back 5 generations from there that would be 64 names at the most. I estimated I could have this done in a year if I entered 1 name per week. For my line shown below, I have 30 names plus a second husband for 1 person and 1 line that goes back 1 more generation—33 names total—so it would take less than a year at that rate.

gather1
Bow Tie Chart for Williamson + Buisch

To get started:

3. Gather all the research documents you have for the person you are starting with.
4. Assess what you have:

Birth?
Marriage?
Death?
All applicable census records?
Photos?
Other?
Source citations?

5. What don’t you have that you would like to find?

For now just make a note of what’s missing. create a list on the Name Page of the person you are working on. [Trust me, just make a list for now otherwise you will likely get side-tracked in a major way. Don’t ask how I know this.]

6. What else would you like to add to your Surname Notebook for each person?

I try to add a chart of some sort from either Ancestry.com or Family Tree Maker.

7. Next, you are going to scan and download from online sources everything you have gathered.

Download what you can from online sources and then scan photos and documents you have from other sources.

I save everything in a folder on my hard drive. The folder is labeled as SURNAME_Name_Initial_b[year]. Each document, photo, etc., gets saved as:

SURNAME_Name_Initial_b[year]_EventYearMonthDay_Location_Event/DocumentType.

My 2nd great grandmother’s baptism would look like this:

CORMODE_Jane_C_b1828_18280413_LezayreIOM_baptism

The EventYearMonthDay is an 8-digit number. For example, a census document is the year of the census followed by 4 zeroes. The baptism from above is 18280413 for 13 April 1828. This way everything should order itself from the earliest item to the latest inside the folder.

===

I know someone out there is thinking, “But, Erin, I have 29,000 names in my tree!” Hire help. That’s all I’m saying. [Just kidding…] Think in terms of your direct lines only. As I said above, if you start with one set of grandparents and go back 5 generations from there, that is only 64 names assuming you have every person named going back that far. Sixty-four names is doable in a year. Worry about the next 64 names in 2015.

In the next few posts, I will show you a couple different ways to add the documents to your Surname Pages so you can start adding what you gathered together.

Remember: Slow, Steady and Systematic

1 Surname / 1 Name at a time / 1 Week at a time / For 1 year

===

________________________________________________________________________________________

Cite This Page:

Erin Williamson Klein, “Gather Your Research Documents.” My Family History Files, 11 April 2014 (https://myfamilyhistoryfiles.com/organization/gather-your-research-documents: [access date]).

Please do not copy without attribution and link back to this page.

________________________________________________________________________________________