Posted on 3 Comments

Downloading record images to save for a rainy day

Updated 6 February 2015: It appears my source of information about the Ancestry free access day was misinformed. The free access appears to be for records in the UK, not access to all Ancestry records. I edited the post to reflect this change.

This weekend Ancestry is offering free access to their UK records. I know quite a few of you are involved in the Genealogy Do-Over and the free access is a Bright Shiny Object (#BSO) that could suck away your weekend in no time. For me it is a BSO because I have given up my Ancestry membership temporarily while I work on getting my files in order and I will not be resisting the temptation of free access. I plan to take advantage of it. Fortunately I won’t have unlimited Internet access until Sunday afternoon so I cannot get sucked into a weekend-long, follow-every-rabbit-trail, download-until-I-am-cross-eyed marathon. I have taken advantage of the free access to UK and Canadian records in the past and used OneNote to aid me in the process.

This is a post about how I use OneNote when the free access to Ancestry’s records is offered without letting it becoming a Really Big and Beautiful BSO that sucks me in not only for the weekend but possibly even longer. I could enter the record images I am downloading onto a Research Log. However it takes time and thought to be sure I am putting information in the log correctly and on the correct log. (I have a separate one for each surname.) I also have a tendency to get sidetracked looking at people’s trees and using the search function to fall down rabbit holes. I want to keep as focused as I can and I want a quick and easy way to download the records and cite the sources. I will go back at a later date and analyze the records, record everything in my Research Plan and on my Research Log and then write up my written conclusion before I enter anything into my genealogy software—steps 8 through 13 of my workflow.

If you want to use my method for quickly capturing records, there are a couple of things you need to do before you start.

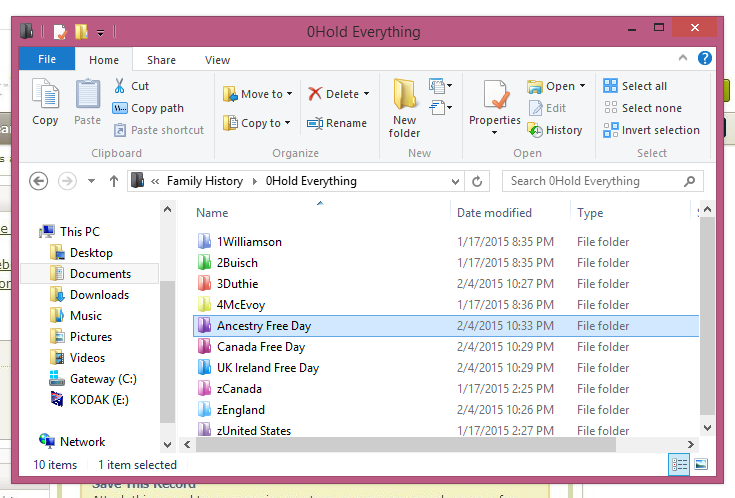
  1. Make a new folder on your hard drive just for the record images you are going to be downloading during the free access.
freeaccess1
Because I am participating in the Genealogy Do-Over, all my files are in a HOLD folder. I created a new folder called Ancestry Free Day for this weekend’s downloads. You can see that I also have a folder for a Canada Free Day and a  UK Ireland Free Day that were previously held.

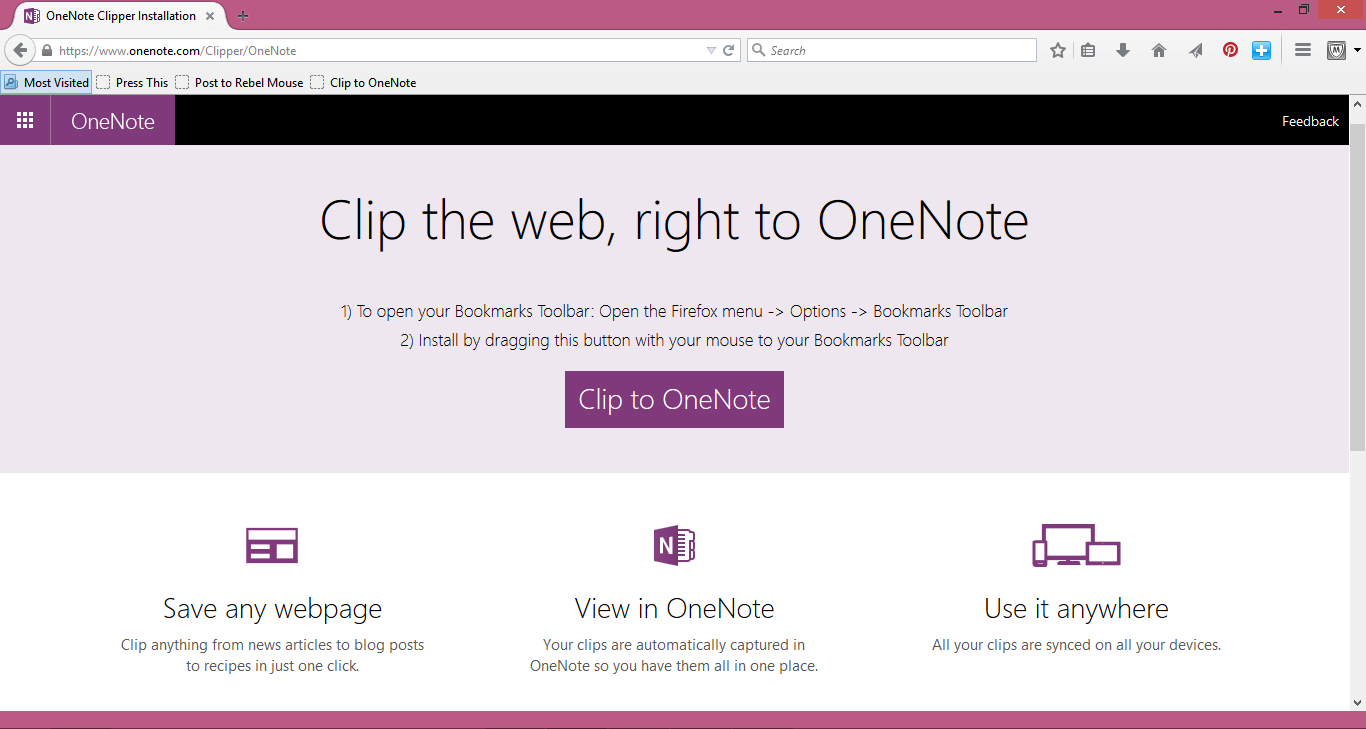
  1. Be sure to install the Clip to OneNote app for your web browser. Here is the link for the OneNote Clipper: https://www.onenote.com/Clipper/OneNote
insert1
I use FireFox as my web browser so the OneNote Clipper app web page gives me the instructions on how to install the clipper for FireFox. The page should display whatever instructions you need to install the clipper in your web browser.

Now once the free access begins, you are going to start downloading record images to the folder you created. Some of the images you are going to know that, yes, this is my person and some you are not going to be sure. Download them anyway. Trust me. Just do it. If I find five Ray Williamsons in the the 1930 Rochester Census, I am going to download all the images. If I find three baptism records for William Williamson in Lancashire England, I am going to download all of them. You are going to download now and analyze their usefulness later. I figure if a record turns out to be useless or a duplicate, I can delete it later. It does help your focus if you have some research goals already in mind though! My focus for this free access weekend is going to be on my direct lines from England and the Isle of Man.

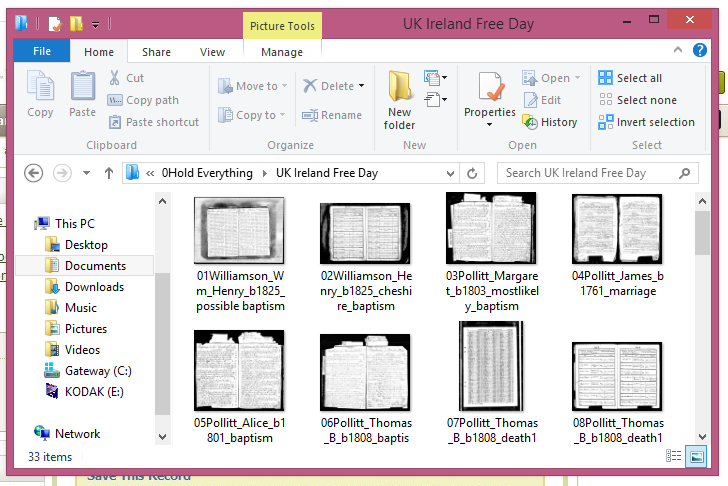
As you are downloading and naming the saved records, number them in chronological order. This will help you later with the Source Citations you are going to copy as well.
freeaccess2
I number them 01, 02, 03, etc. with Surname_FirstName_Initial_b####_recordtype. The b#### is for a birth year—even if it is approximate—as it helps me distinguish between family members with the same name. Along with the record type, I may make personal observations like ‘most likely’ or a place name or something else pertinent to the record image.

I am going to digress here a bit to explain why it is helpful to download records that come up in searches or shaky leaf hints other than those that you know  for certain are for your specific ancestor. My great-great grandfather, Wm Henry Williamson was born about 1825 in England. The birth year is guesstimated from a ship’s manifest, censuses and cemetery interment records. His parents are Thomas and Margaret Williamson both born about 1803 in England. There are at least three different Thomas and Margaret Williamson couples that have been linked as possible parents in baptism records to my great-great grandfather on Ancestry and FamilySearch. One Thomas is a farmer in Cheshire, another is a weaver in Lancashire and the third is a tollgate keeper also from Lancashire. So which one is the right couple? Or are any of the linked baptism records the right one for my great-great grandfather?

If I am applying the Genealogical Proof Standard to my research, I should have copies of as many baptisms of the children from these couples as I can find to prove or disprove my written conclusion on whether the farmer, the weaver or the tollgate keeper is Wm Henry Williamson’s father and that a particular baptism record is indeed the correct record for him, right? So I am going to download pretty much every baptism record I can find for any child with parents Thomas and Margaret Williamson in Cheshire and Lancashire.

There are three ways to get the source citation information from Ancestry into OneNote. I realize that the source citation information from Ancestry might not always be in the correct format as outlined by Elizabeth Shown Mills in Evidence Explained nor contain all the information you need to properly cite a source in your genealogy software. Three things I try to consistently do as I am copying citations from Ancestry is to (1)Identify the source citation in such a way that it is clear which record image the citation belongs to (the chronological numbering), (2)Provide myself with the date I accessed the record online and (3)Add the page link in case I need to go back to the record later.

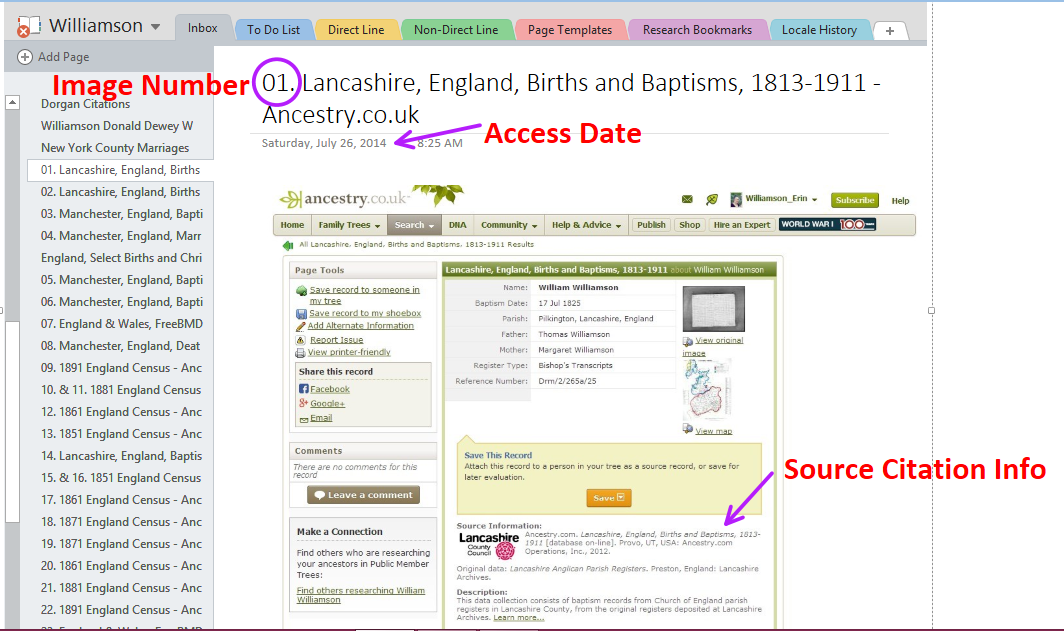
The simplest way to capture the source information for a record image you have downloaded is to use the Clip to OneNote app for your web browser. Anything you clip from the web with the app goes to the Quick Notes Section of the first notebook that was created when you installed OneNote. Even if you renamed that section, your clips from the web should end up there. It takes a few seconds for the record to show up in the Quick Notes Section; but as soon as it does, I add the chronological number in front of the title so this source matches my downloaded record image.
freeaccess3
Two things to note—At the bottom of this image is the link to the web page that the image was clipped from. It is inserted automatically on my OneNote page but I didn’t want to make the graphic even smaller to show it. You’ll also note that all my source citation pages that were created during the UK Ireland free access day have been moved from the Quick Notes Section to the Inbox of my Williamson Notebook. That is the drawback to using the Clip to OneNote app—you cannot tell it where to put the clip so you have to go back later and move them.

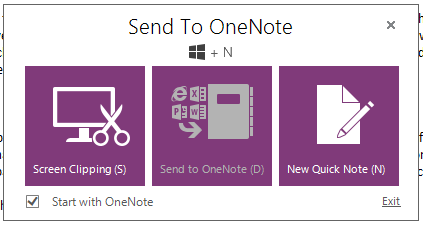
The second way to capture the source information is to use the Screen Clipping Tool in the Send to OneNote app.
freeaccess4
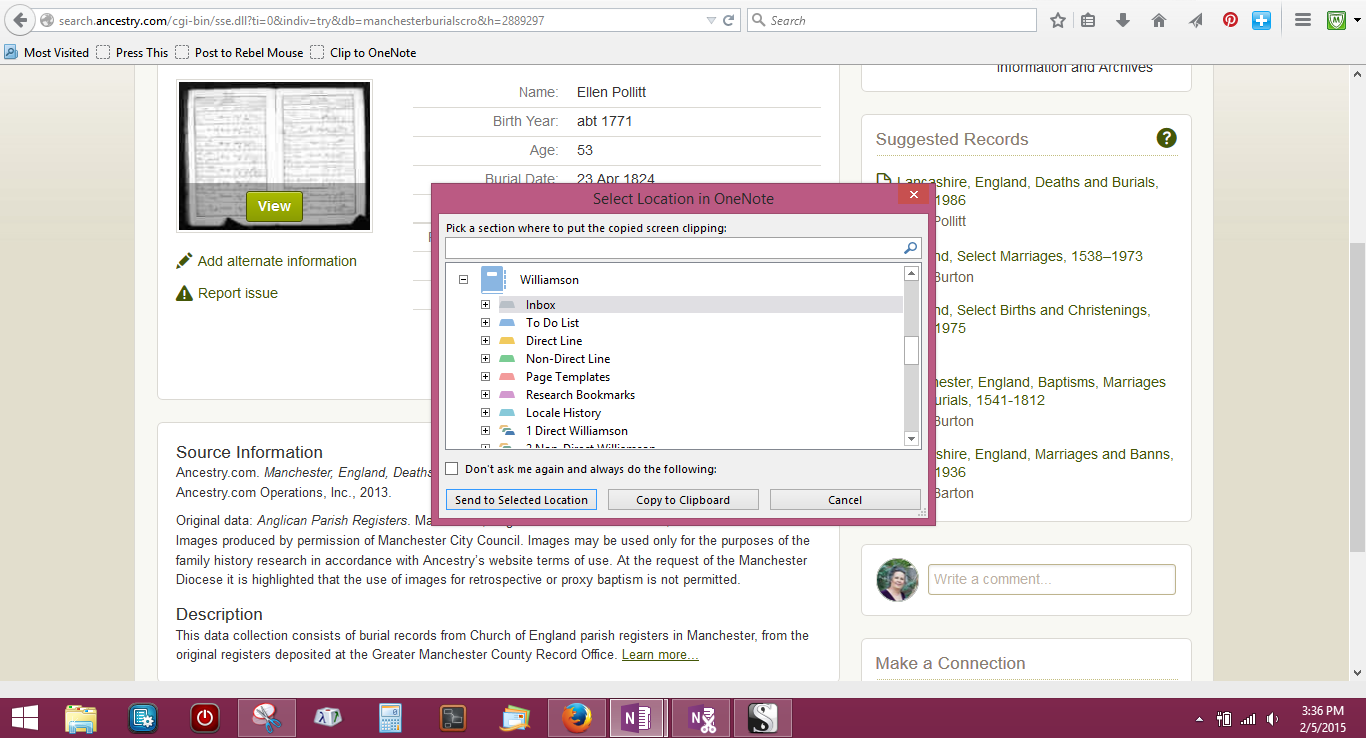
You can clip just the portion of the web page that is relevant to the record image you downloaded. After you have clipped the source citation information, you are asked where you want to send the clip. I send it to the Inbox of the appropriate Surname Notebook.
freeaccess5
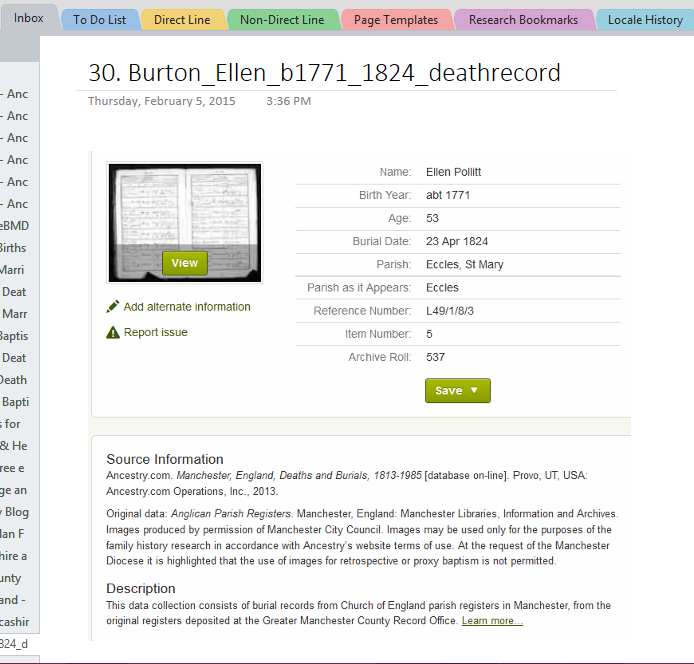
When the clip gets to your Surname Notebook Inbox, you will have to add the title. I use the same number and file name I used when I saved the record image. The drawback to this method is that the web link is not automatically added at the bottom of the page so you have to remember to go back and add it.
freeaccess6
The third method involves a bit more copying and pasting but in the long run it sets you up nicely for inputting information into your Research Log when the time comes to start working with the records and analyzing what you have saved. In your Quick Notes Section or the Inbox of one of your Surname Notebooks, create a new page. Because the folder I created to hold the record images is called Ancestry Free Day, I named the new page Ancestry Free Day Citations.

freeaccess7

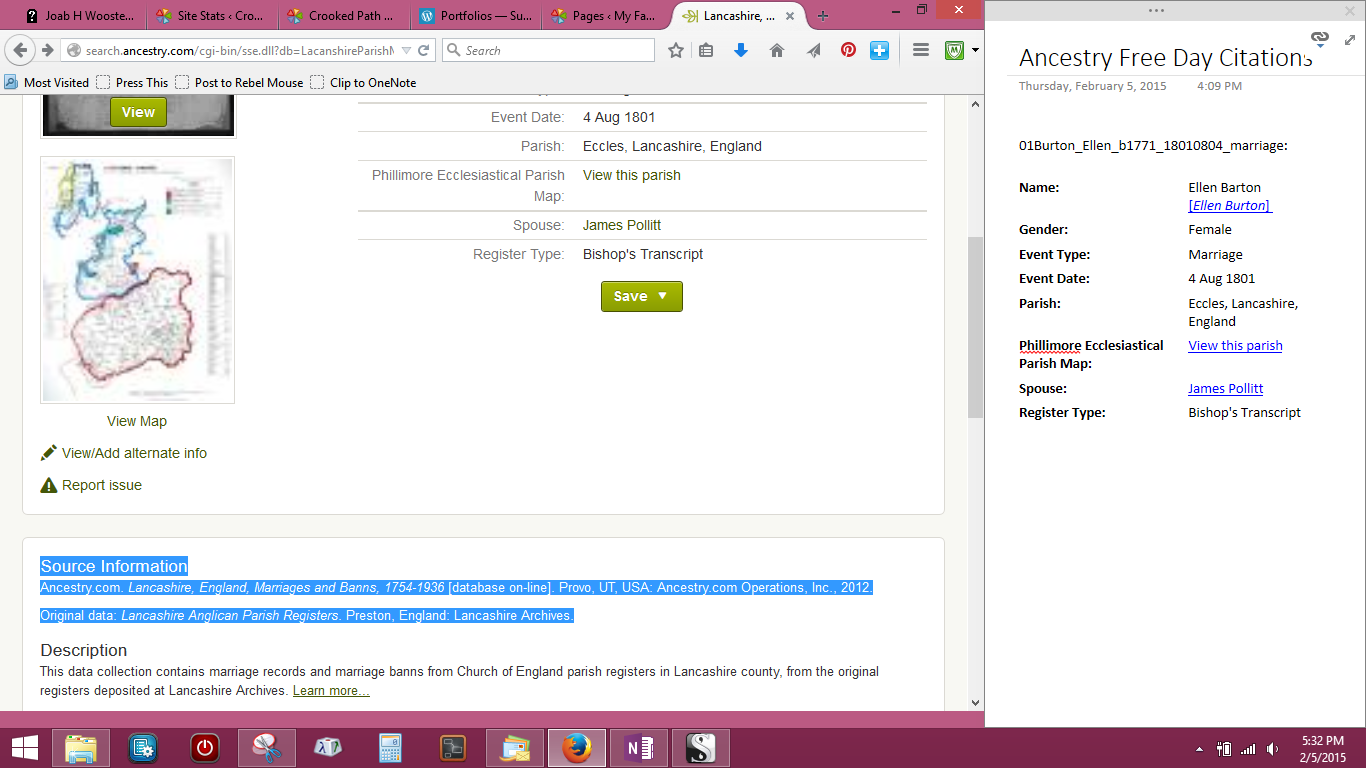
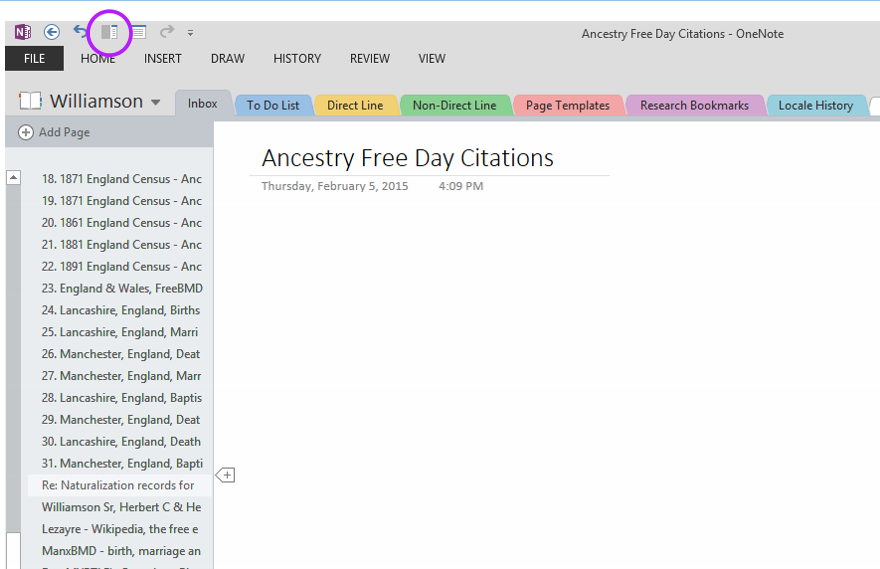
At the top right of OneNote, there is a little icon that looks like a split screen. When you click it, your blank page should shrink and dock itself to the right side of your computer screen. If Quick Notes doesn’t dock to the right of your screen, click on the down arrow under the linked chains and choose Linked Note Options. Under Display, be sure the box next to Dock new Quick Note windows to the side of the desktop is checked. Now you can have your web browser opened and the Quick Notes window at the same time. (You can smoosh the Quick Notes window up a bit if you want to make your browser window just a bit wider.)

The first record I saved is a marriage record for my 4th great grandmother. In Quick Notes, I have copied and pasted the name I used for the downloaded record image, the information about the record image from Ancestry and I have copied but not yet pasted the source citation information. A link back to this web page will also be inserted into Quick Notes. After I am done with that record, I will move on to the Suggested Records links that Ancestry shows me on the current record page (if there are any) and repeat the process.
freeaccess8
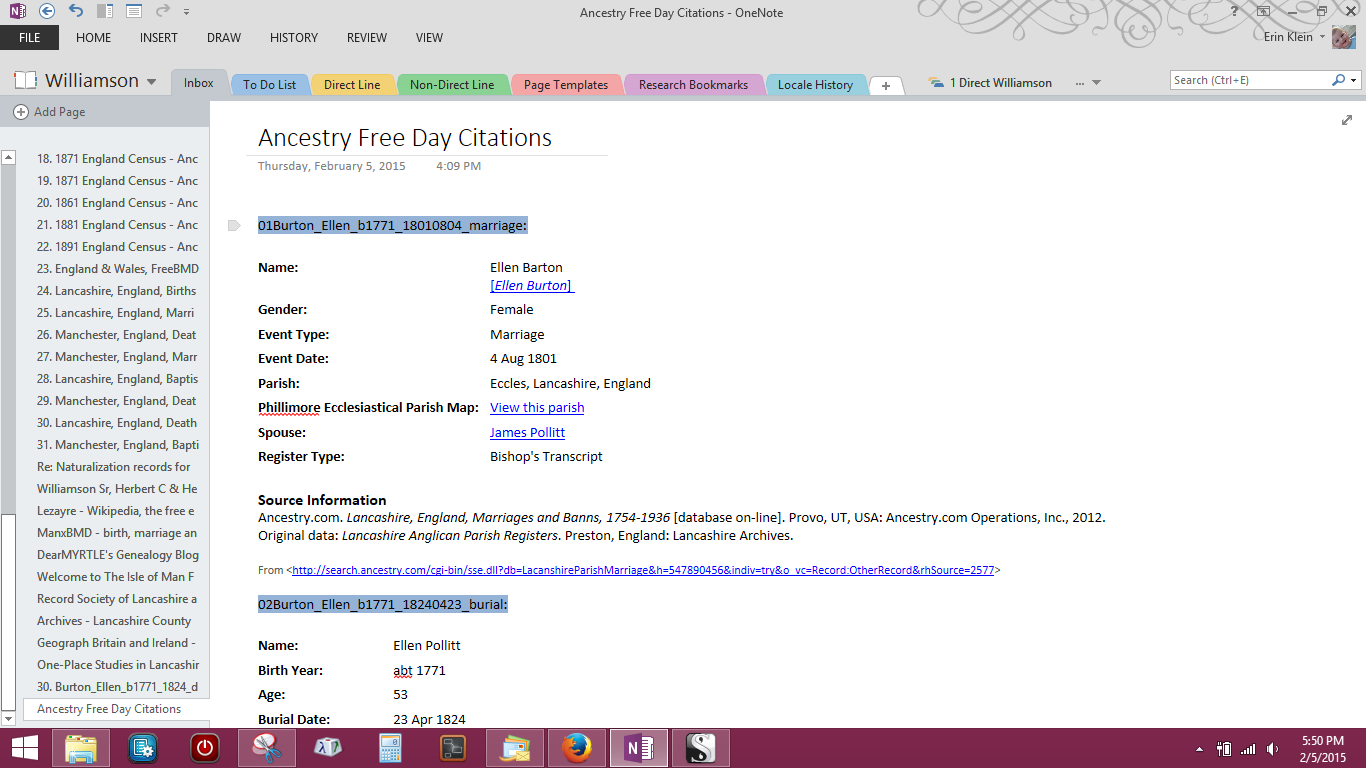
To undock the Quick Notes window, click on the arrow icon. My Ancestry Free Day Citations page will look something like this after I have added all my record image citations. You can see how copying the source citation information this way will lend itself to easy copying and pasting directly into a Research Plan or Record Log at a later date.
freeaccess9
So there you have it. Go, play and download lots of record images to save for a rainy day.

===

Post edited 23 April 2020 to update links to the Genealogy Do-Over.


Cite This Page:

Erin Williamson Klein, “Downloading record images to save for a rainy day.” My Family History Files, 5 February 2015 (https://myfamilyhistoryfiles.com/organization/downloading-record-images-to-save-for-a-rainy-day : [access date]).

Please do not copy without attribution and link back to this page.

Posted on 10 Comments

Part 3 – Quirks Continued – Pages for Family Groups

alphabet treeContinuing on in my Surname Notebooks and all their quirks… I am giving you a grand tour of my OneNote Surname Notebook section by section and page by page. (Hopefully it still won’t turn into a 3-hour tour and we end up on stranded on Gilligan’s Island…) The very last Section in the Main Section Group [explained in this post] is for Page Templates—templates of the pages I use for each family group in my surname notebooks.

If you missed it, there is more on my notebook setup here [Part 1] and here [Part 2]. At the bottom of this post are links to 2 styles of Surname Notebooks that you can view online at OneDrive and a link to download them and open in OneNote. If all else fails, there are PDF versions as well. [Updated 28 February 2015.]

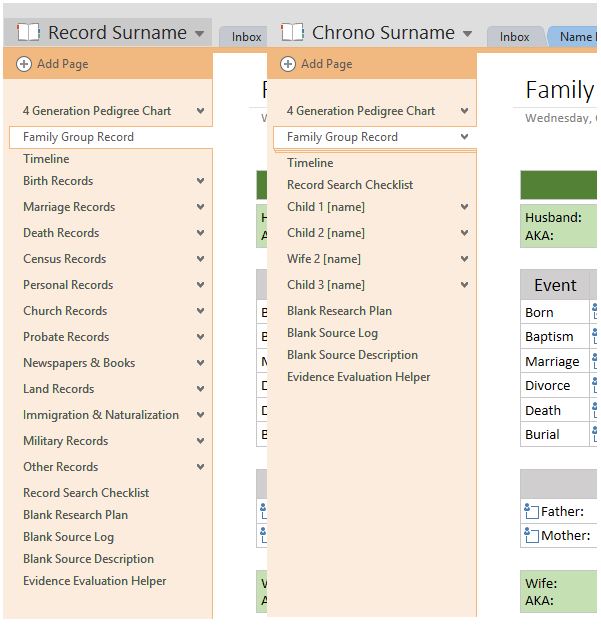
When I started out at the beginning of 2014 putting my research files into OneNote, I had the Pages for each family group organized by record type—BMD, Probate, Land, etc. My original thoughts were that this would help guide me through the research process as I looked for sources in each record type. I have since switched to keeping the Pages for each family group sorted by person and the sources for each family group and person are listed in chronological order.

quirks3-1


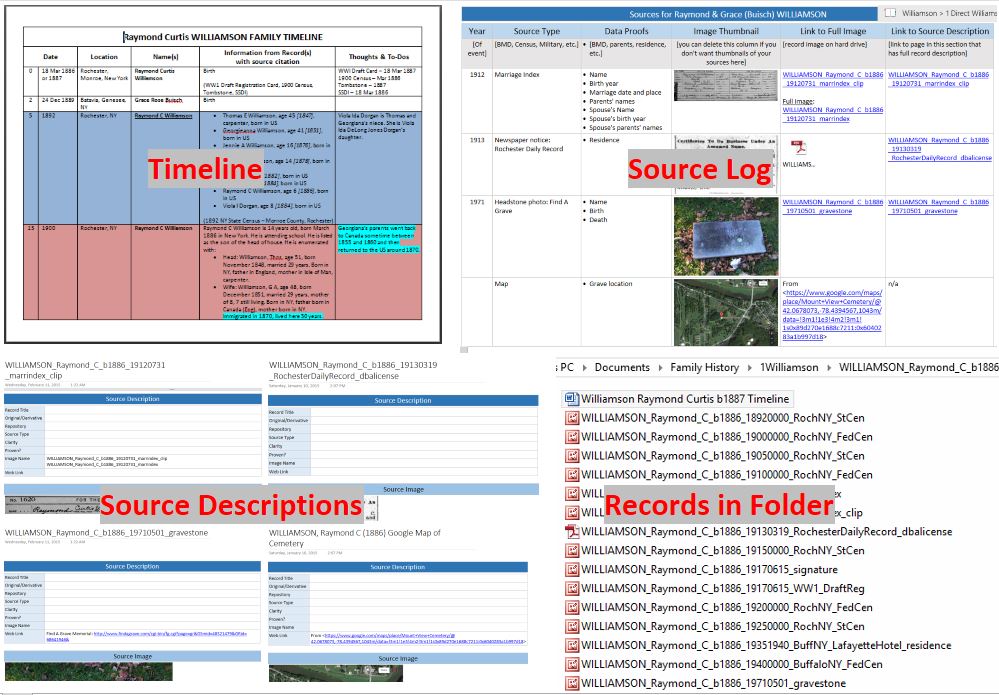
The reason I switched mid-stream is because that is the way the record images are sorted on my hard drive—by person and in chronological order. Sorting everything in OneNote the same way I do on my hard drive allows me to see that I have an entry on the Timeline for each entry on the Source Log and every entry on the Source Log has a Source Description Page that includes its Source Citation and all that matches the list of files on the hard drive.

quirks3-2


I decided to keep the Record Type Surname Notebook as well as the Chronological Surname Notebook because I know that some people sort their record images by type on their hard drive. I thought it would be beneficial to have a Surname Notebook that sorts by record type for those that do.

All the information gathered and sorted in both notebooks is exactly the same, it is just presented in 2 different formats as shown in first graphic above. Both notebooks have Family Group Sheets, Timelines, Record Checklists, Source Logs, Source Description Pages, and Research Plans with a Research Log.


===

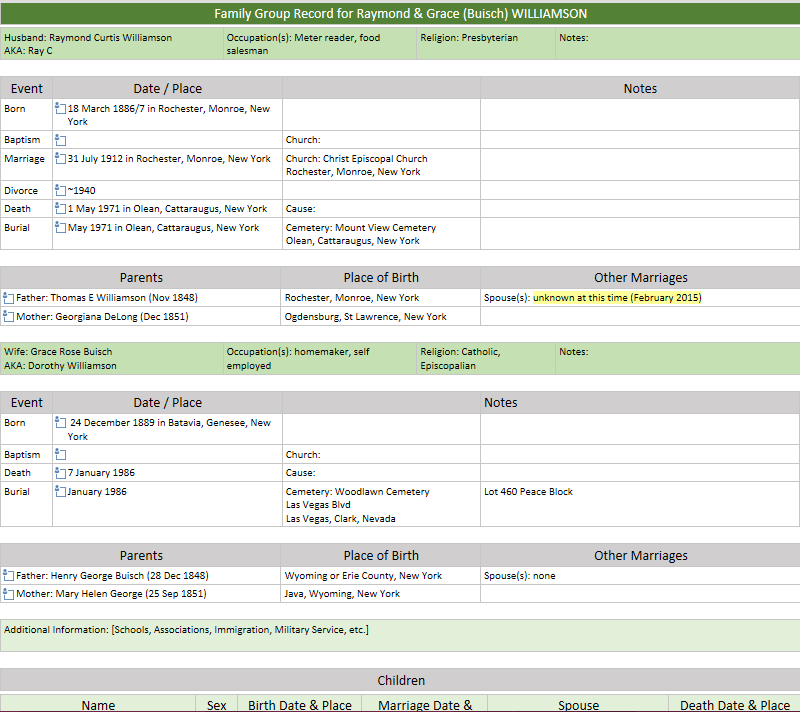
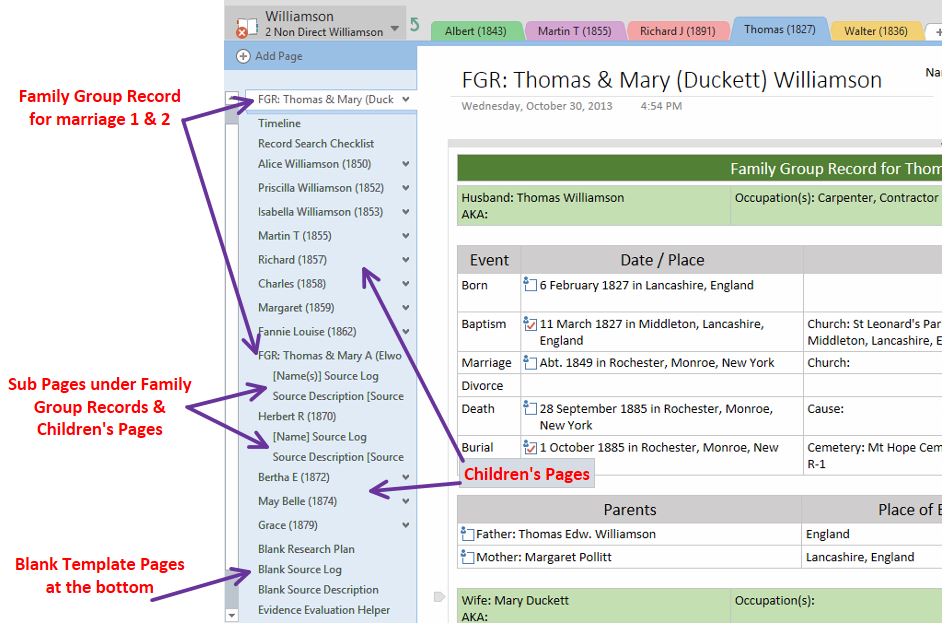
When you are looking at a family group in the Direct Line Surname, Non-Direct Line Surname and the A-Z Lines in the notebooks I created, you will see each one has a Family Group Record [FGR] Template. When you add new family groups to your notebooks, start by adding a Family Group Record Template. This is where all the basic information about each family group begins to be entered into OneNote. [Because I am using the Chronological Surname Notebook, each of the graphics that follow will reflect that.]

quirks3-3


Above the FGR is a place to put charts to help you navigate where you are in your family line when you are working on a particular family group. The charts can be printed from your genealogy software right to OneNote or clipped from a screen shot in your software, from Ancestry or FamilySearch. The charts do not have to be a 4 generation pedigree chart. Use whatever will help you keep track of where this family group fits in your tree.

quirks3-4


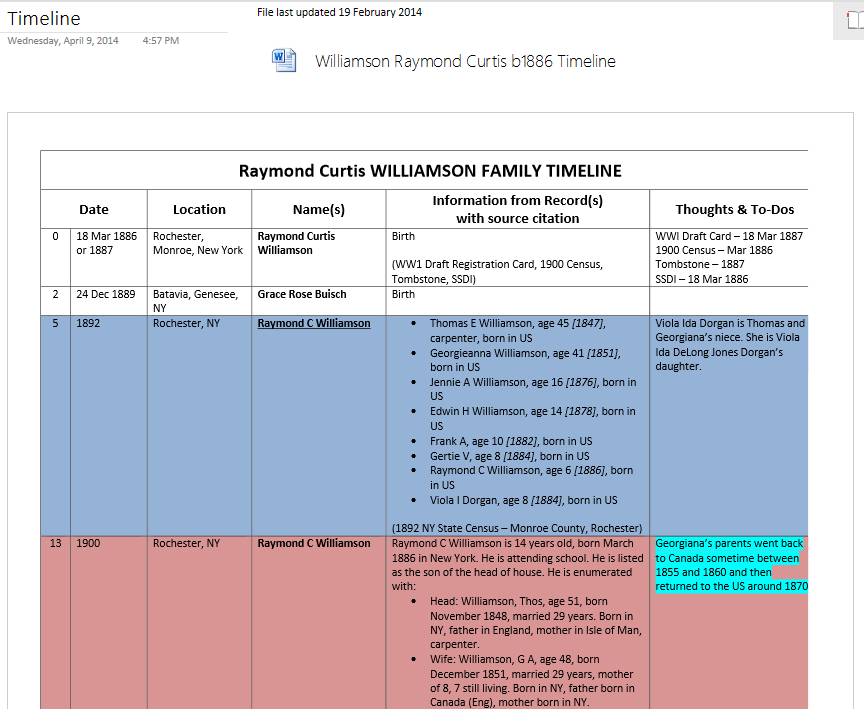
Below the FGR is a page for a Timeline. I like using Timelines to help me sort through the information I have gathered to see what is missing and where there are conflicts of information. Use or disregard this template as you desire.

quirks3-5


===

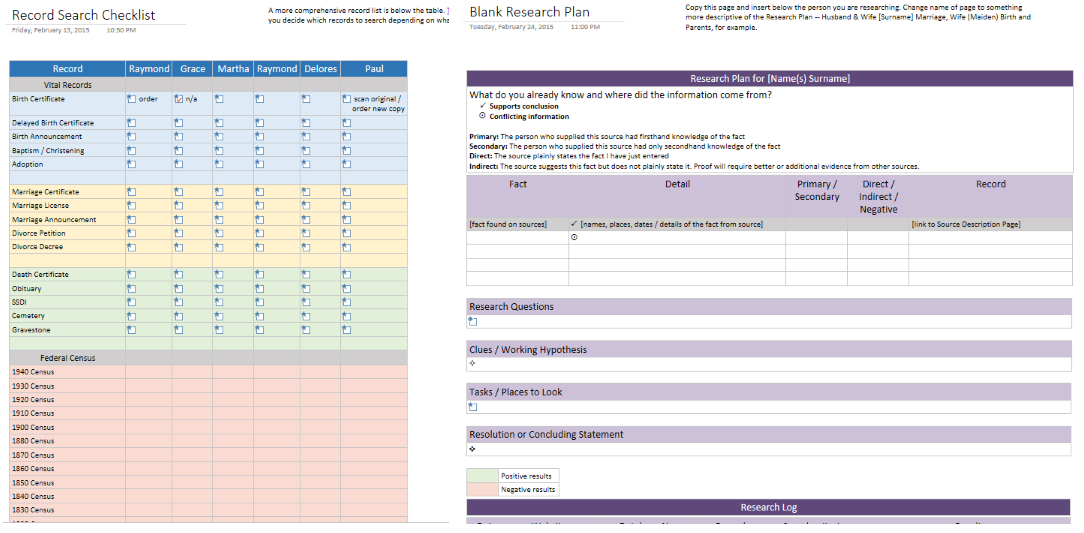
Below the Timeline is a Record Checklist that you can use to help guide you through the research process. As you locate a source, check it off on the list. In the Record Type Surname Notebook, this list is broken down by record type instead of being one long list and appears in sections on the Page for each record type.

After the Record Checklist is where I am keeping my Research Plans. The form I am using for Research Plans has a Research Log at the bottom of the page. Instead of keeping one Research Log for all my research or sorting it by surname, I am keeping a log of the research and searches I do in conjunction with planned research on a person or family group. [My reason for doing it this way can be found here [LINK]].

quirks3-6


If you prefer to keep a log by surname, you can start a Section in the Main Group for your Research Log and keep it there. If your Research Log is in Excel, embed it on a Page in that Section and with a click you can open your Excel Research Log. Any updates to the log will be reflected in the embedded log in OneNote as well.


===

Below the Research Plan are new pages for each one of the children. If the husband marries again, I add in a new Family Group Record for that marriage. If the wife remarries, her new FGR gets sorted under her new surname in the Non Direct A-Z Section Group. At the very end are some blank templates for the Sub-Pages that go under the Family Group Record and the Children’s Pages.

quirks3-7


(Some of you are probably taking on water and getting worried about being stranded on the island about now, but the tour is almost over. You’re gonna make it… I promise!)

===

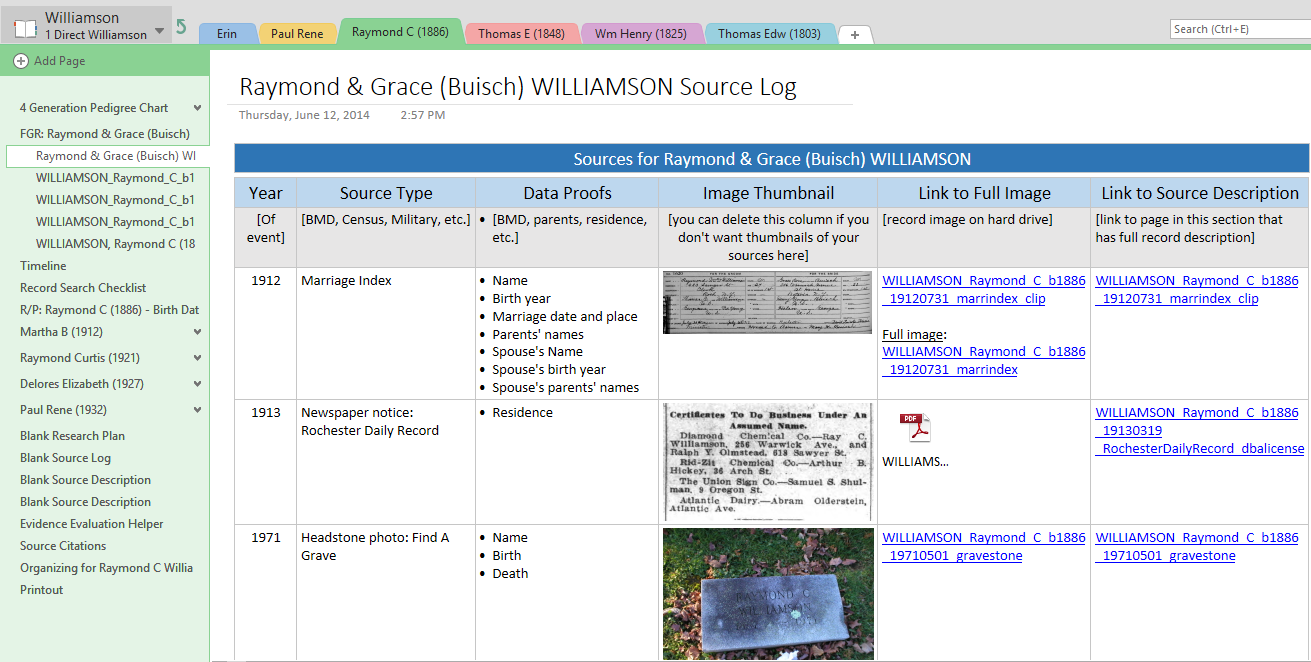
The Sub-Pages are all about the sources themselves. The first Sub-Page under the FGR is a Source Log. It contains a list of every record I have for the family group or couple depending on how many sources I have. If there are a lot of sources for the children, I plan to give them their own Source Log as a Sub-Page under their name rather than on the Source Log under the FGR. On the Source Log is a thumbnail of the source image, a link to the full image on my hard drive and a link to the Source Description Page.

quirks3-8

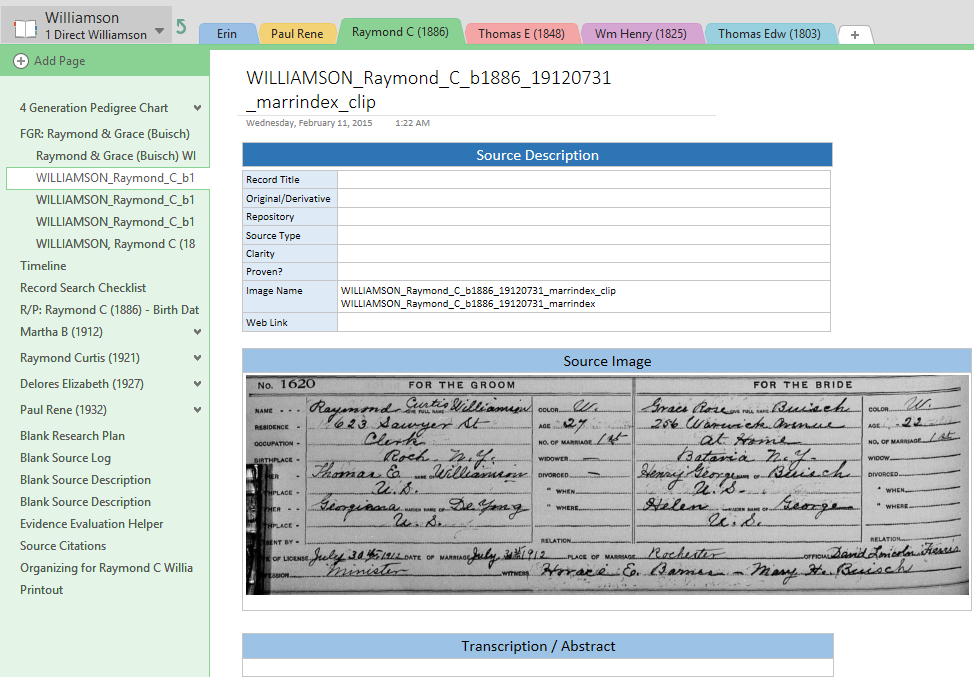
The Source Description Page is where all the nitty-gritty details of the source get recorded. There is space for a larger source image and below that, space to transcribe the details of the image. This is where the source gets cited and it gets evaluated for the evidence it provides in favor of or conflicting with the research information you are trying to prove. There will be one Source Description Page for every source I have for a family group. (Now if I were a really good blogger/family historian, I would have this page perfectly filled out as a shining example of how it’s done. But it’s 2am and I am brain dead… I do have the source citation, however. That counts for something, right?)

quirks3-9


===

And finally, I owe a big, BIG thank you to Christine Sisko Svircev for sharing her Source Description page and Research Plan with us over at the OneNote for Genealogy Facebook Group. I wouldn’t have been able to put my page templates together without hers. And she helped me solidify my thoughts on the whole Research Log dilemma. Thank you, Christine!!


===


 Part 1 – Quirks of My Notebooks – The Main Section

Part 2 – More Quirks – Section Groups & Sections


===


View on OneDrive

Surname Notebook – Sources sorted by Record Type

View on OneDrive

Surname Notebook – Sources sorted in Chronological Order

View on OneDrive

Research Quandaries Notebook

Link to “By Record Type” Surname Notebook Link to “Chronological Sources” Surname Notebook Link to Research Quandaries Notebook
Surname Notebook by Record Type PDF Surname Notebook in Chronological Order PDF


===

This page was updated on 10 April 2020 with new links to the notebooks on OneDrive.


Cite This Page:

Erin Williamson Klein, “Part 3 – Quirks Continued – Pages for Family Groups.” My Family History Files, 11 April 2014 (https://myfamilyhistoryfiles.com/organization/quirks-continued: [access date]).

Please do not copy without attribution and link back to this page.


Posted on 2 Comments

Part 1 – Quirks of My Notebooks – The Main Sections

alphabet tree

On to my Surname Notebooks and all their quirks… I have made 2 sample Surname Notebooks that you should be able to view on OneDrive by clicking on the OneNote Notebook icons at the bottom of this post. I know that you can view that copy online and there is also an “Open in OneNote” link; however, I am not sure if all operating systems or app versions will be able to download from OneDrive. There is a link at the bottom of this post to a downloadable version of the 2 Surname Notebooks. Some of you should be able to download and open a copy in OneNote from that link. And, just to be sure I have all the bases covered, there is a PDF file for both of the Surname Notebooks. [More about why there are 2 versions in this post.]

OneNote is available for free across multiple platforms

I’m going to give you a grand tour of parts of my Surname Notebook section by section. (Hopefully it won’t turn into a 3-hour tour and we end up on stranded on Gilligan’s Island…) I should also note that some of this is evolving as I go, so if doing it some other way makes more sense to you, go for it.

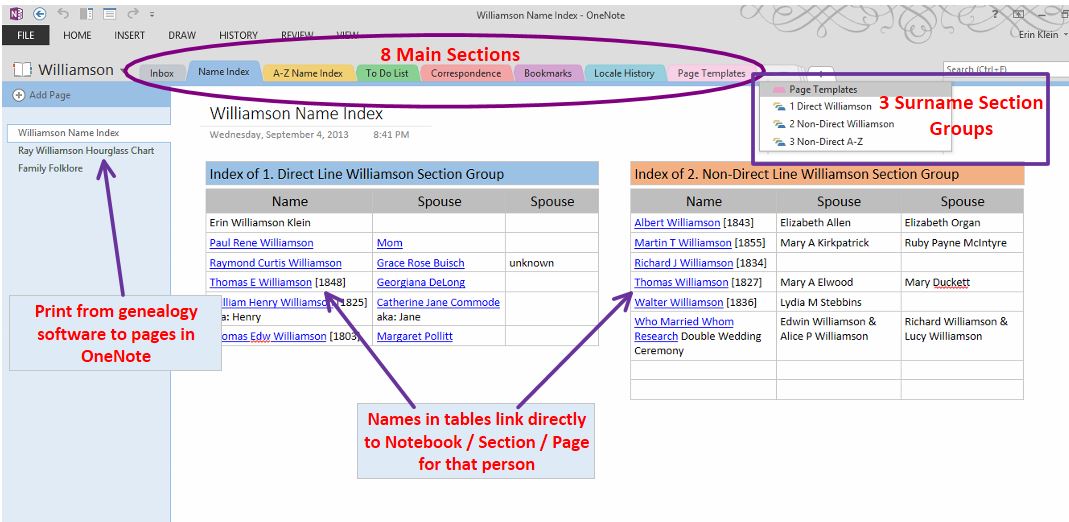
The first eight Sections—the Main Group of Sections you see when you look at the Surname Notebook—are for general information pertaining to that Surname. The first Section is an Inbox. It is a holding place for things that need to be moved to people’s Sections and Pages within this notebook. I put things here when I don’t have time to properly sort them to the Sections and Pages where they belong. Or I’m not quite sure yet where it belongs—info for a potential family member that I haven’t yet proved belongs in my line, for example.

The Name Index Section Tab is a table of contents page for your direct line ancestors and non-direct surname collateral lines that are in the first two Section Groups listed after this Main Group. (You can see all 3 Section Groups by clicking on the drop-down arrow.) There are two tables on the first Page in this Section—one table for your direct line ancestors and the other for non-direct (collateral) lines of this surname.  In the tables, you can create links to the Notebook, Section and/or Page to everyone in both your direct line and non-direct lines. Below the first page, there is a page for a generation chart. I print my chart from my genealogy software right to this page. (See Printing to OneNote for instructions on how to do this.) There is also a page for Folklore to list family stories that have been passed down through the generations.

quirks1


===

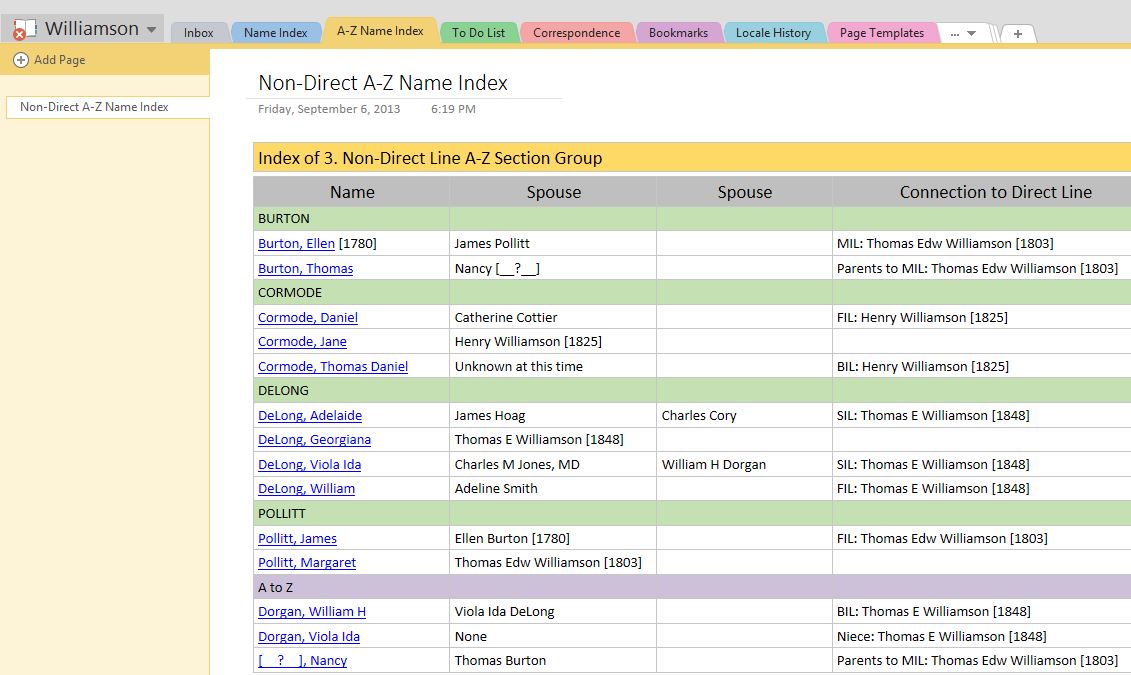
The next Section Tab is for the third Section Group—Non-Direct A-Z. These are the people who have married into your line. The A-Z Name Index has the same sort of table for indexing the names of the people in this group. I explain a bit more about these 3 Sections Groups here and about the Pages in the Sections here.

quirks2


===

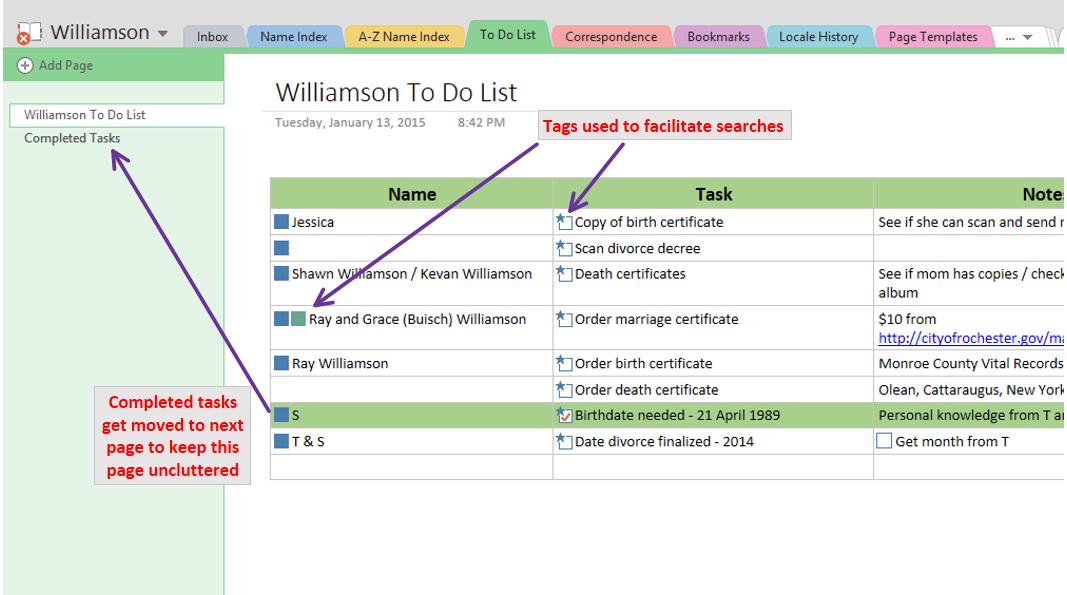
The fourth Section Tab is a simple To Do List. I just kept this simple as I don’t need a lot of detail here. The details all go onto the Pages for the Research Plan / Log.

quirks1-3


The next Section is for Correspondence. I haven’t done a lot with this section yet as I haven’t been sending out requests for records. There is a table on the first Page for Records Requested to log where and when you sent for records and when and what the response was. The next Page in this Section is a place to send emails from others about your surname. Then you are free to clip and paste the appropriate portions of the email to a person’s Pages, leaving the email in one place. Another option is to link from their Pages directly to the email. You can Tag emails that are about multiple people to have the email come up in Searches. One last thing you might keep in this Section is a List of Contacts with an address, email and phone number.


===

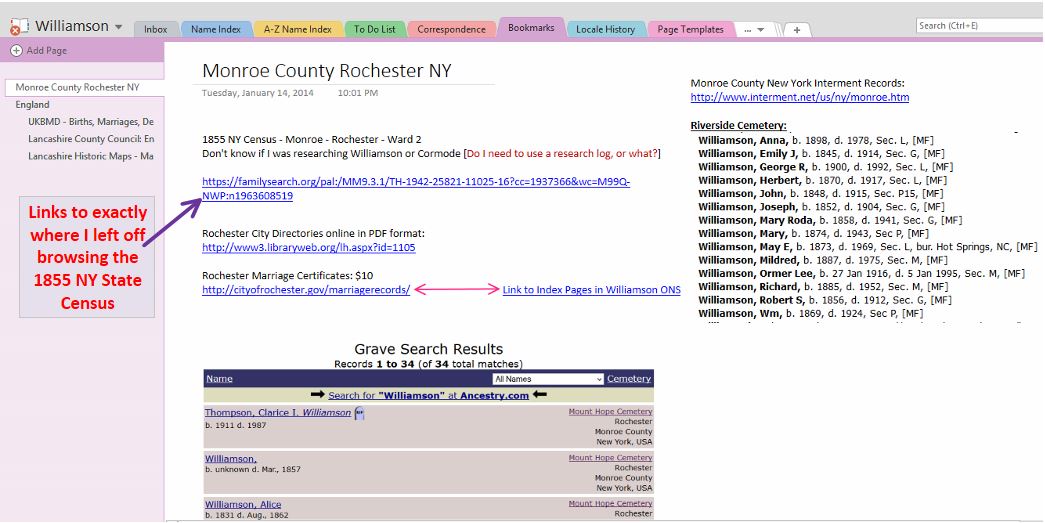
The Bookmarks Section is for anything I find or am doing online that pertains specifically to this surname. Any links to records online that may be pertinent in later research go here. Also, if I am in the middle of browsing through records at Ancestry.com or FamilySearch.org and I stop in the middle of the records, I can add a link to wherever I was and return at a later time to pick up right where I left off.

quirks4


===

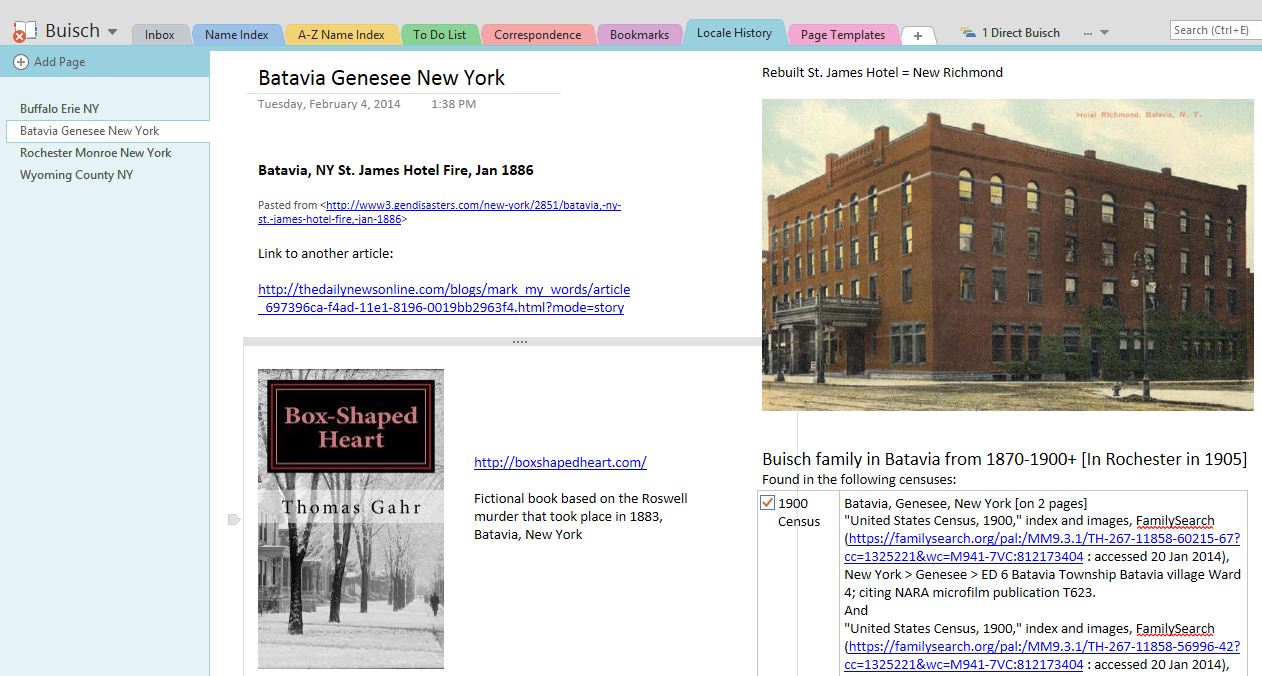
The seventh Section is for information pertaining to the history of the locations where my ancestors lived. The kind of information that adds to the backdrop of their life and times. If they lived in multiple locations, I start a Page in this Section for each location. On the [Name of Location] Page, I might have maps, copies of / or links to historical articles I find online, copies of old postcards—whatever strikes my fancy at the time. In my example below I even have a link to a historical fiction book written about a local event that I think would be an interesting read.

quirks1-5


===


Part 2 – More Quirks – Section Groups & Sections

Part 3 – Quirks Continued – Pages for Family Groups


===


View on OneDrive

Surname Notebook – Sources sorted by Record Type

View on OneDrive

Surname Notebook – Sources sorted in Chronological Order

View on OneDrive

Research Quandaries Notebook

Link to “By Record Type” Surname Notebook Link to “Chronological Sources” Surname Notebook Link to Research Quandaries Notebook
Surname Notebook by Record Type PDF Surname Notebook in Chronological Order PDF


===

This post was updated on 10 April 2020 with new links to the notebooks on OneDrive.


Cite This Page:

Erin Williamson Klein, “Part 1 – Quirks of My Notebooks The Main Sections.” My Family History Files, 09 April 2014 (https://myfamilyhistoryfiles.com/organization/quirks-of-my-notebooks: [access date]).

Please do not copy without attribution and link back to this page.